
Thanksgiving is one of those holidays where I love having the kids in the kitchen with me. It doesn’t always have to be a big baking project either. Sometimes the simplest cookies are the ones that get everyone excited.
If you’re looking for Thanksgiving cookies to make with kids, I’ve put together some of my favorite easy ideas, including no-bake treats, decorated sugar cookies, pumpkin-inspired cookies, and super cute turkey treats.
1. No-Bake Oreo Turkey Cookies
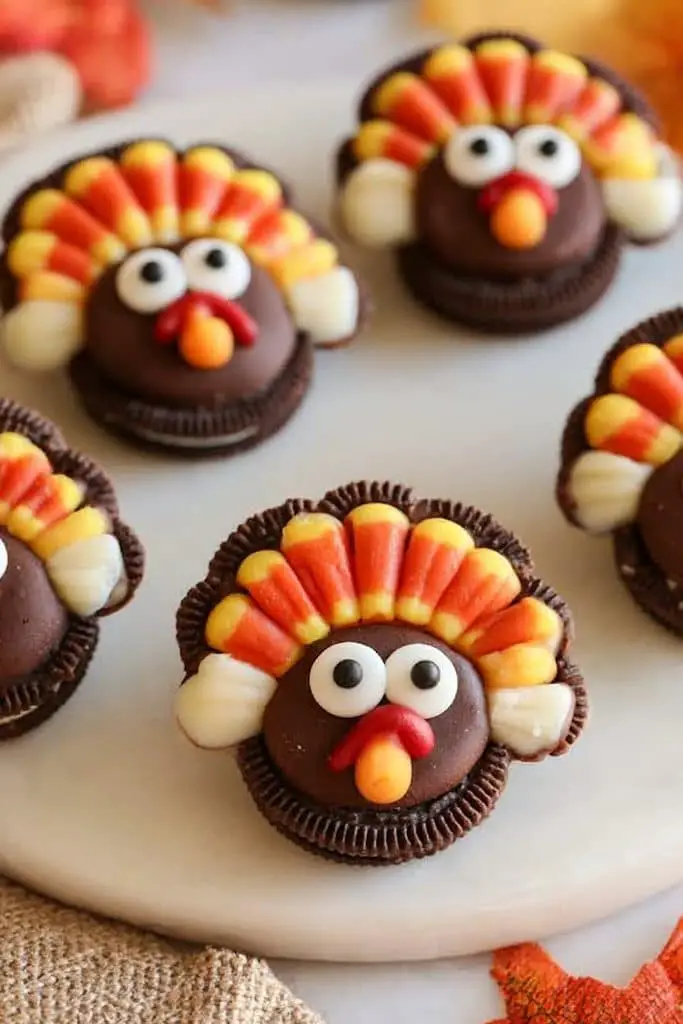
These Oreo Turkey Cookies are probably one of the most fun Thanksgiving treats I would make with kids. They are super cute, take only a few minutes to put together, and you don’t need any baking experience.
I especially like this recipe for younger kids because most of the work is simply decorating. The cookies become little turkeys with candy-corn feathers, candy eyes, and a tiny candy beak. Similar versions of this Thanksgiving cookie are made specifically as kid-friendly, no-bake treats.
Prep Time: 10–15 minutes
Cook Time: 0 minutes
Difficulty: Very easy
Makes: About 12 turkey cookies
Why I Love These Thanksgiving Turkey Cookies
What I love most about these is that they don’t need to be perfect. In fact, I think the funny little turkey faces are part of the fun!
Kids can help place the candy corn, add the eyes, and make each turkey look a little different. If you’re putting together several Thanksgiving recipes for a family gathering, this is also a nice one to give the kids while the adults are busy with dinner.
Ingredients
For 12 turkey cookies:
- 12 Oreo sandwich cookies
- 12 mini peanut butter cups or small chocolate candies
- 60 pieces candy corn, about 5 for each turkey
- 24 candy eyes
- 12 small orange candies or candy-corn pieces for the beaks
- Red decorating icing, for the turkey wattles
- ½ cup melted chocolate or thick white frosting, for attaching the decorations
The exact design can vary. Some versions use a whole Oreo with candy-corn feathers, while others separate the cookie and use an additional candy for the turkey’s head and body.
How to Make Oreo Turkey Cookies
1. Prepare the Oreo Cookies
If you’re using the simple version, keep the Oreo cookies together.
If you want to make the slightly more detailed turkey shape, carefully separate each Oreo. Keep the cream-filled half for the turkey body and use another cookie half for the feather section.
I usually prefer the simple version when making these with younger kids because there are fewer pieces to handle.
2. Add the Candy Corn Feathers
Take five pieces of candy corn for each cookie.
Press the pointed ends gently into the cream filling around the top of the Oreo. Fan them out slightly so they look like turkey feathers.
This is probably my favorite part because the cookie starts looking like a turkey almost immediately.
3. Add the Turkey Face
Place a small amount of frosting or melted chocolate where you want the turkey’s face.
Press on two candy eyes and add a small orange candy or piece of candy corn underneath for the beak.
You don’t need much frosting here. A tiny dab is enough to hold everything in place.
4. Add the Wattle
Use a little red decorating icing beside the beak to create the turkey’s wattle.
This small detail makes such a difference. Suddenly, your plain Oreo looks like a little Thanksgiving turkey!
5. Let the Cookies Set
Place the finished cookies on a parchment-lined plate or baking sheet.
Let them sit for about 10–15 minutes, or until the chocolate or frosting has firmed up enough that the decorations stay in place.
2. No-Bake Nutter Butter Turkey Cookies
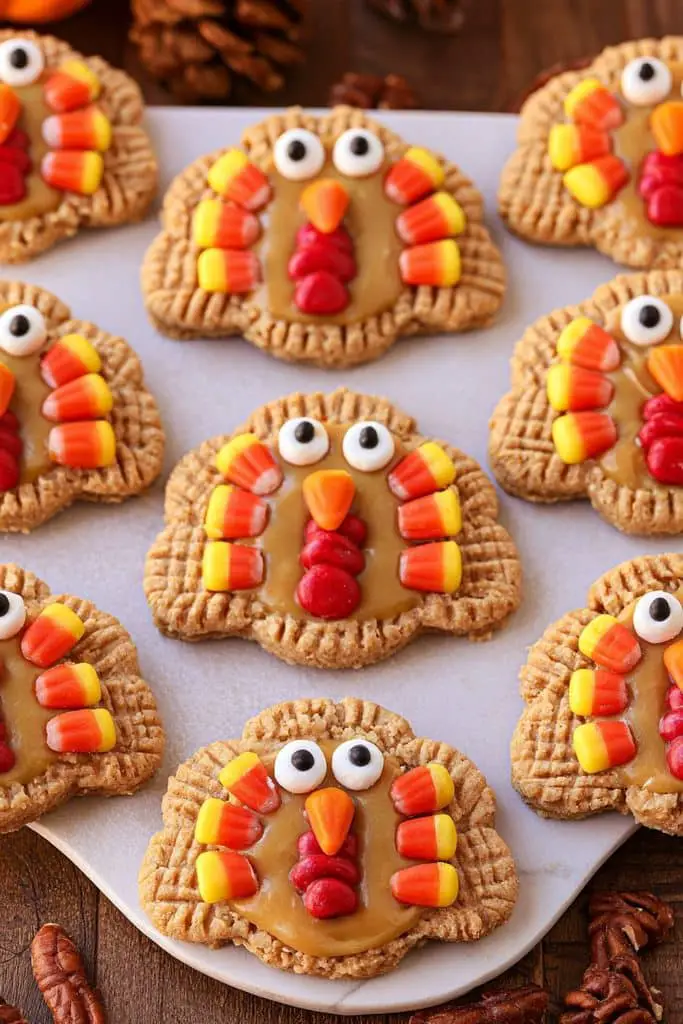
If you want Thanksgiving cookies kids can make without turning on the oven, these cute Nutter Butter turkey cookies are a fun choice. I love recipes like this because they feel more like a little Thanksgiving activity than a regular baking project.
They are no-bake, simple to assemble, and super cute on a Thanksgiving dessert table. Kids can help decorate the faces and add the colorful turkey feathers, while an adult can handle the melted chocolate. This recipe makes about 8 turkey cookies and takes around 45 minutes in total, including chilling time.
Prep Time: 15 minutes
Chill Time: 30 minutes
Cook Time: 0 minutes
Difficulty: Easy
Makes: 8 turkey cookies
Ingredients
- 8 full-size Nutter Butter cookies
- 12 oz semi-sweet chocolate chips
- 1 teaspoon vegetable oil
- 32 mini pretzels
- 16 small candy eyes
- 8 chocolate candy corn pieces
- 3 tablespoons orange sprinkles
- 3 tablespoons red frosting
How to Make Nutter Butter Turkey Cookies
1. Decorate the turkey faces
Place the red frosting into a small piping bag or a zip-top bag with a tiny corner cut off.
Add two small dots of frosting near the top of each Nutter Butter cookie and gently place the candy eyes on top.
For the beak, cut away the brown part of a piece of chocolate candy corn so you are left with the orange section. Add a small dot of frosting below the eyes and place the orange piece there.
Use a little more red frosting beside the beak to create the turkey’s wattle.
2. Melt the chocolate
Line a few baking sheets, trays, or cutting boards with parchment paper.
Place the chocolate chips and vegetable oil in a microwave-safe bowl. Heat in short 20-second intervals, stirring between each one, until the chocolate is completely smooth.
The oil is optional, but I find that it helps the chocolate melt more smoothly.
3. Make the turkey feathers
Dip each mini pretzel into the melted chocolate.
Place four chocolate-covered pretzels together in a half-circle shape on the parchment paper. These will become the turkey’s tail feathers.
While the chocolate is still soft, gently place a decorated Nutter Butter cookie over the ends of the pretzels. Press very lightly so the cookie sticks to the chocolate.
4. Add the colorful sprinkles
Before the chocolate sets, sprinkle the exposed pretzel feathers with orange sprinkles.
This is one of my favorite parts for kids because they can help decorate each turkey and make every cookie look a little different.
5. Let the cookies set
Place the turkey cookies in the refrigerator for about 30 minutes, or until the chocolate has completely hardened.
Once set, carefully transfer them to a serving plate and enjoy them chilled or at room temperature.
Easy Variations
You can have a little fun with these cookies for Thanksgiving. If you cannot find chocolate candy corn, a small orange candy can work for the beak.
You can also use milk chocolate or dark chocolate instead of semi-sweet chocolate. And if you want to save time, store-bought chocolate-covered pretzels can be used instead of dipping the pretzels yourself.
3. Easy Thanksgiving Pilgrim Hat Cookies
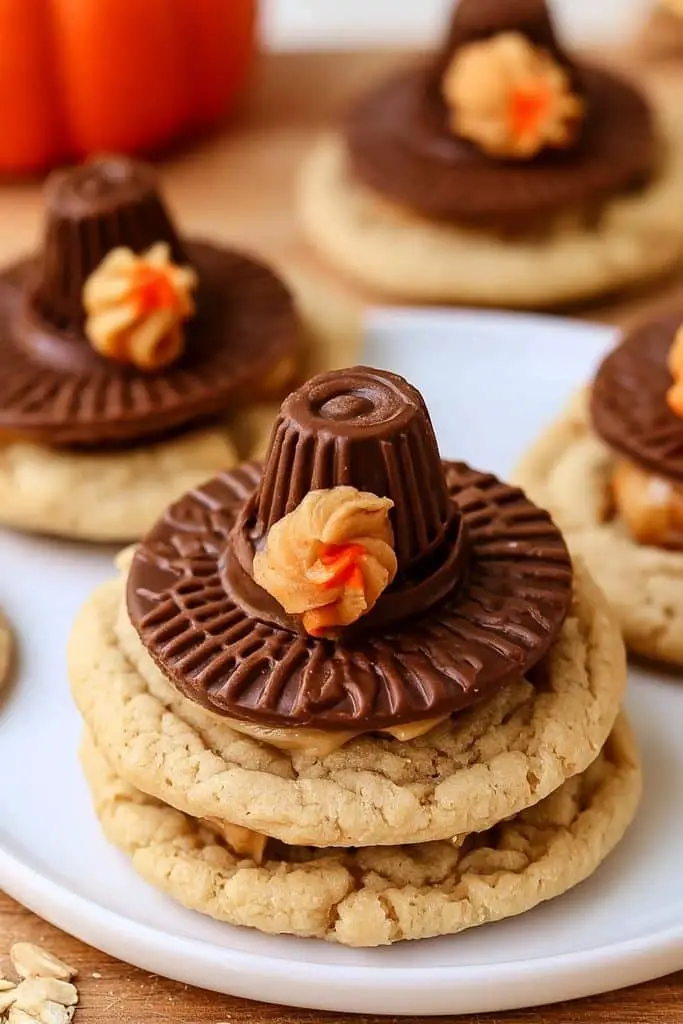
These Thanksgiving Pilgrim Hat Cookies are one of those simple treats that make the holiday feel extra fun. I love that you can turn a few store-bought ingredients into adorable little hats without spending hours in the kitchen.
There is no baking involved, so this is a great recipe when you want Thanksgiving treats to make with kids. The kids can help assemble the hats, add the little candy buckles, and of course sneak a few candies along the way.
Prep Time: 10 minutes
Chill Time: 15–20 minutes
Cook Time: 0 minutes
Difficulty: Very easy
Makes: 12 cookies
Ingredients
- 12 Fudge Stripe cookies
- 12 Reese’s Miniature Peanut Butter Cups, unwrapped
- ⅓ cup yellow frosting
- 12 orange mini M&M candies
How to Make Thanksgiving Pilgrim Hat Cookies
1. Prepare the cookies
Line a baking sheet or large plate with parchment paper.
Place the Fudge Stripe cookies on the parchment with the chocolate-striped side facing down. The flat chocolate side will become the top of the hat brim.
2. Add the frosting
Put the yellow frosting into a piping bag or a small zip-top bag with the corner snipped off.
Pipe a small circle of frosting in the center of each cookie. Make the circle slightly wider than the bottom of the peanut butter cup.
The frosting will help hold everything together and will also become the yellow hat band.
3. Add the peanut butter cup
Unwrap the Reese’s Miniature Peanut Butter Cups and place one upside down in the center of each cookie.
Press it gently into the frosting. A little frosting should spread around the bottom of the cup, which helps create the look of a hat band.
4. Make the buckle
Place a small orange M&M onto the yellow frosting at the front of each hat.
If it does not stick right away, add the tiniest dab of frosting to the back of the candy and press it gently into place.
5. Let the hats set
Place the cookies in the refrigerator for about 15–20 minutes so the frosting can firm up.
Once they are set, arrange them on a serving plate and they are ready to enjoy.
Easy Variations
One thing I like about these cookies for Thanksgiving is how easy they are to change. You can use different colors of frosting for the hat band or swap the orange M&M for another small candy.
You can also use a different round cookie if you do not have Fudge Stripe cookies. Some versions use other chocolate cookies or even different types of frosting, so it is easy to work with what you already have in the pantry.
4. Easy No-Bake Acorn Cookies
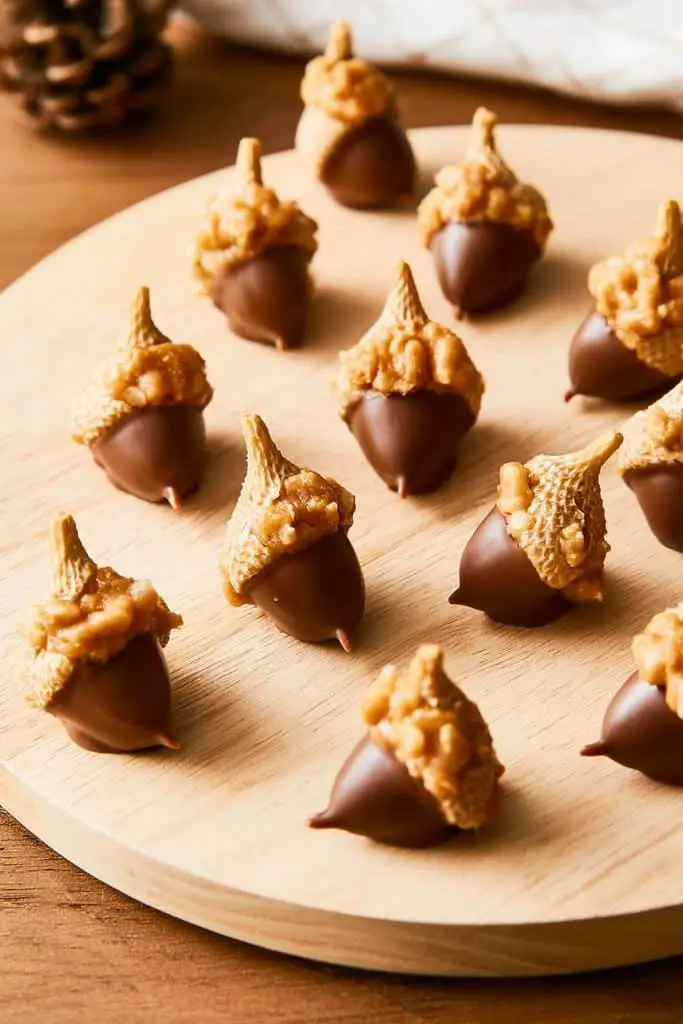
These little No-Bake Acorn Cookies are one of those fall treats that look much more complicated than they really are. I love how just a few simple ingredients can turn into tiny acorns that look so cute on a Thanksgiving dessert table.
There is no oven needed, and the recipe only takes about 15–20 minutes of hands-on prep. Kids can help place the cookies, add the chocolate candies, and finish each acorn with a little chip on top. It is an easy choice when you want fun Thanksgiving treats to make with kids without a lot of work.
Prep Time: 20 minutes
Chill/Set Time: About 15–30 minutes
Cook Time: 0 minutes
Difficulty: Very easy
Makes: About 24 acorn cookies
Ingredients
- 24 mini vanilla wafer cookies
- 24 HERSHEY’S KISSES Milk Chocolate Candies, unwrapped
- 24 butterscotch chips
- About ½ cup chocolate frosting or cookie icing
How to Make No-Bake Acorn Cookies
1. Prepare the cookies
Line a baking sheet or large tray with parchment paper.
Place the mini vanilla wafer cookies on the tray with the flat side facing up. This flat surface will make it easier to attach the chocolate pieces.
2. Attach the chocolate kisses
Put the chocolate frosting or icing into a small piping bag. You can also use a zip-top bag with a tiny corner snipped off.
Pipe a small dab of frosting onto the bottom of each HERSHEY’S KISS. Immediately press the candy onto the flat side of a vanilla wafer.
Hold it gently for a few seconds so the frosting can start to set.
3. Add the acorn tops
Once the chocolate kisses are attached, add another tiny dab of frosting to the top center of each wafer.
Place one butterscotch chip on top. The chip becomes the little stem or cap that gives the cookie its acorn shape.
4. Let the acorns set
Continue until all the cookies are assembled.
Place the tray in the refrigerator for about 15–30 minutes, or until the frosting has firmed up enough to hold everything together. If you use a frosting that takes longer to set, give the acorns a little more time.
5. Serve
Once the acorn cookies are firm, transfer them to a serving plate.
I like arranging them in a small bowl or scattering them around other Thanksgiving recipes on the dessert table. They are small enough for kids to grab easily, and they make such a cute little fall decoration too.
Easy Variations
The classic version uses mini vanilla wafers, HERSHEY’S KISSES, and butterscotch chips, but you can easily change the flavors.
Try peanut butter chips instead of butterscotch chips for a stronger peanut butter flavor. You can also use different HERSHEY’S KISSES varieties to give the acorns a slightly different chocolate flavor.
If you want to use Nutter Butter Bites instead, there are also existing versions that pair them with chocolate kisses and mini chocolate or peanut butter chips.
5. Thanksgiving Turkey Sugar Cookies
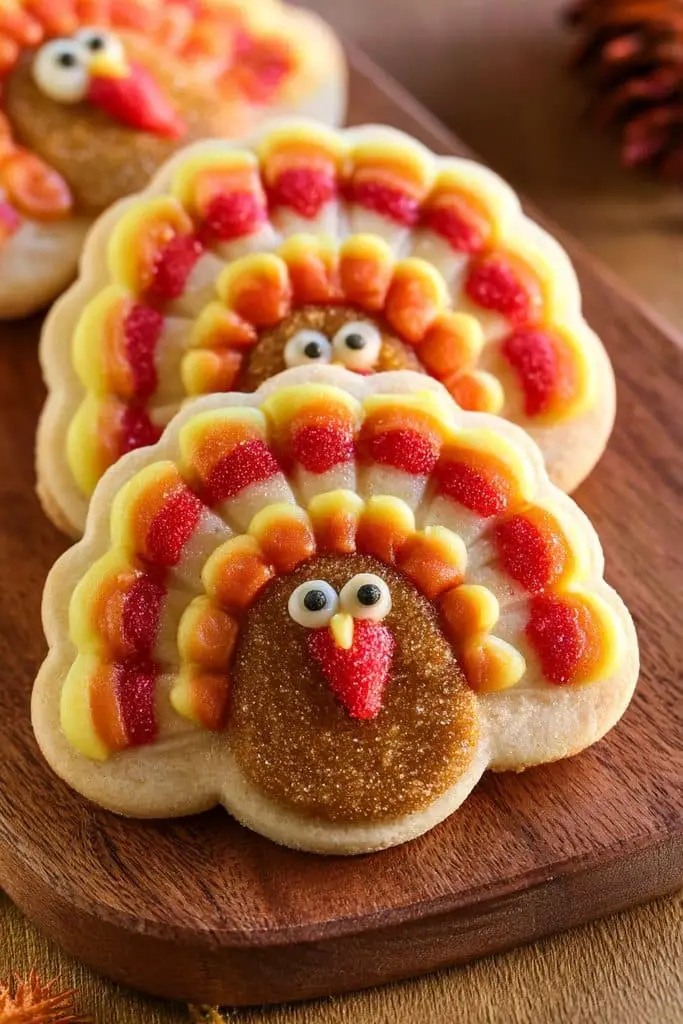
These Thanksgiving Turkey Sugar Cookies are one of my favorite kinds of holiday treats because they turn a simple sugar cookie into something fun and festive. I love recipes that let kids get involved, and this one is mostly about decorating, so there is plenty for little hands to do.
The easiest version starts with refrigerated sugar cookie dough, which means you do not have to make the dough from scratch. After the cookies are baked and cooled, kids can help add the chocolate frosting, candy corn feathers, eyes, beaks, and little turkey feet. It is an easy recipe that takes about an hour from start to finish.
Prep Time: 20 minutes
Cook Time: About 10–12 minutes
Cooling Time: About 10 minutes
Difficulty: Easy
Makes: About 16 cookies
Ingredients
- 1 package refrigerated sugar cookie dough
- 1 container chocolate frosting
- Candy corn
- Orange decorating icing
- Black decorating gel
- Mini chocolate candies or M&M’s Minis for the eyes
How to Make Thanksgiving Turkey Sugar Cookies
1. Bake the sugar cookies
Preheat your oven according to the directions on the sugar cookie dough package.
Slice the dough into rounds and arrange the cookies on a parchment-lined baking sheet, leaving a little space between each one.
Bake according to the package directions until the edges are lightly golden. Let the cookies cool completely before decorating.
2. Add the chocolate frosting
Once the cookies are completely cool, spoon the chocolate frosting into a piping bag or a small zip-top bag.
Pipe a thick line of frosting around the outer edge of one half of each cookie. This frosting will hold the candy corn in place and create the turkey’s feathered tail.
You do not have to make the frosting perfectly neat. The candy corn will cover most of it anyway.
3. Make the turkey feathers
Arrange 5–6 pieces of candy corn along the chocolate frosting, with the pointed ends facing inward.
I like letting kids choose their own colors and arrange the candy corn themselves. Some turkeys may have perfectly even feathers, while others may look a little more playful and that is part of the fun.
This decorating method is also used in established Thanksgiving turkey cookie recipes from Pillsbury and Food Network.
4. Make the turkey face
Use the orange decorating icing to make a small V-shaped beak underneath the eyes.
For the eyes, pipe two tiny dots of orange icing and place a mini chocolate candy or M&M Mini on each dot.
Add a tiny dot of black decorating gel to the center of each eye.
5. Add the turkey feet
Use the orange icing to draw two simple legs underneath the turkey’s face.
Add three small lines at the bottom of each leg to make the toes. You do not need to be an expert at decorating the simple shapes are what make these cookies so cute.
6. Let the cookies set
Allow the decorated cookies to sit for a few minutes so the frosting and icing can firm up.
Then transfer them to a serving plate and enjoy them with your Thanksgiving desserts.
Easy Variations
The great thing about these cookies for Thanksgiving is that you do not need to follow the decoration exactly. You can use homemade sugar cookies instead of refrigerated dough if you have a favorite recipe, or use premade sugar cookies when you want to make things even easier.
You can also change the candy decorations. Try different colors of candy-coated chocolates for the eyes, or use candy eyes instead of M&M’s. For the feathers, candy corn gives the classic Thanksgiving look, but colorful sprinkles can be fun too.
If you want a more traditional homemade version, you can make turkey-shaped sugar cookies with a cookie cutter and decorate them with royal icing. That version takes more time, but it can be a fun project for older kids who enjoy decorating.
6. Spiced Thanksgiving Leaf Sugar Cookies
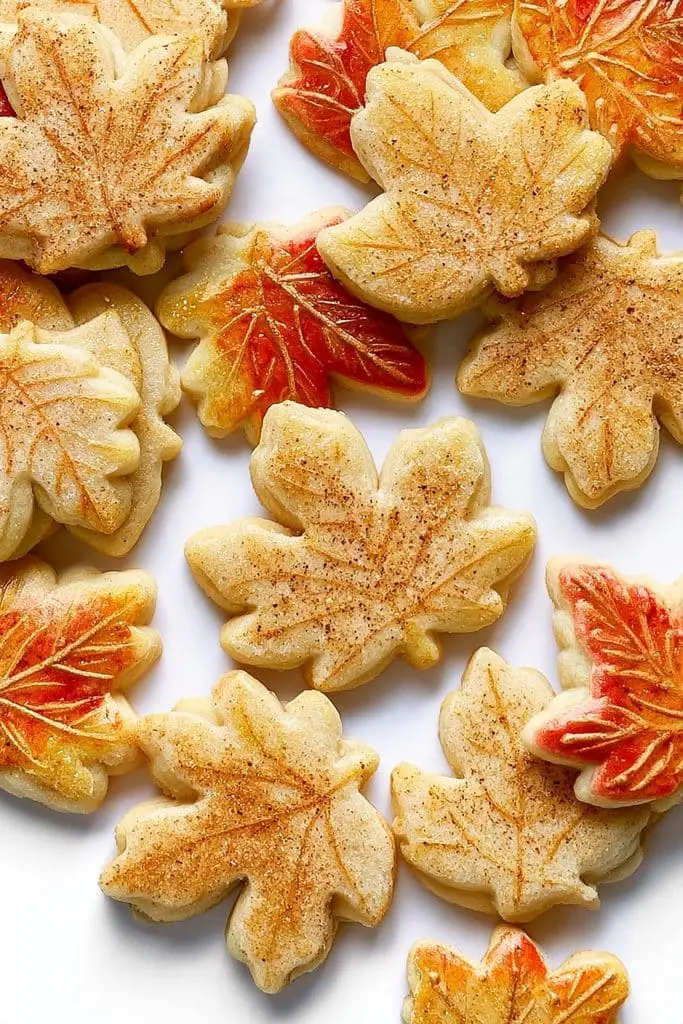
When I think about Thanksgiving baking, warm spices and colorful fall leaves always come to mind. These Spiced Thanksgiving Leaf Sugar Cookies bring both together in one simple treat, with a soft sugar-cookie base and a little cinnamon and ginger for that cozy fall flavor.
I especially like making these with kids because there are several fun jobs they can help with. They can roll the dough, press out the leaf shapes, and decorate the cooled cookies with fall-colored icing. The recipe is easy, although the dough needs some chilling time before you can cut the cookies.
Prep Time: 20 minutes
Chill Time: About 30 minutes
Cook Time: 8–10 minutes
Difficulty: Easy
Makes: About 24 cookies
Ingredients
For the Cookies
- 1 cup unsalted butter, softened
- 1 cup granulated sugar
- 1 large egg
- 1 teaspoon vanilla extract
- 2½ cups all-purpose flour
- 1 teaspoon ground cinnamon
- ½ teaspoon ground ginger
- ½ teaspoon salt
For Decorating
- Orange icing
- Yellow icing
- Red icing
- Fall-colored sprinkles, optional
How to Make Spiced Thanksgiving Leaf Sugar Cookies
1. Make the cookie dough
In a large bowl, beat the softened butter and sugar until light and creamy.
Add the egg and vanilla extract and mix until everything is well combined.
In another bowl, whisk together the flour, cinnamon, ginger, and salt. Gradually add the dry ingredients to the butter mixture and mix until a soft dough forms.
2. Chill the dough
Shape the dough into a flat disk and wrap it well.
Place it in the refrigerator for about 30 minutes, or until it is firm enough to roll. Chilling makes the dough easier to handle and helps the cookies keep their shape when baked.
3. Roll and cut the leaves
Preheat the oven to 350°F and line a baking sheet with parchment paper.
Lightly flour your work surface and roll the dough to about ¼-inch thickness.
Let the kids use leaf-shaped cookie cutters to cut out the cookies. Place the leaves on the prepared baking sheet, leaving a little space between each one.
4. Bake the cookies
Bake the leaf cookies for about 8–10 minutes, or until the edges are lightly golden.
Try not to overbake them. You want the cookies to stay tender in the middle while getting just a little color around the edges.
Let them cool on the baking sheet for a few minutes, then move them to a wire rack to cool completely.
5. Decorate with fall colors
Once the cookies are completely cool, it is time for the fun part.
Use orange, yellow, and red icing to decorate the leaves. You can pipe simple lines down the center and across the cookies to look like the veins of real leaves.
For an easier option, let the kids spread a thin layer of icing over each cookie and add a few fall-colored sprinkles while the icing is still wet.
Easy Variations
There are lots of ways to change these Thanksgiving cookies depending on what you have in your kitchen. You can add a little nutmeg or pumpkin pie spice to the dough for an even warmer fall flavor. Established Thanksgiving sugar-cookie recipes commonly use pumpkin pie spice, while other spiced sugar cookies use combinations such as cinnamon and nutmeg.
You can also add a small amount of maple extract for a maple-flavored version. Another easy shortcut is to start with refrigerated sugar cookie dough and add your favorite fall spice before rolling and cutting the leaves.
7. Pumpkin Spice Snickerdoodles
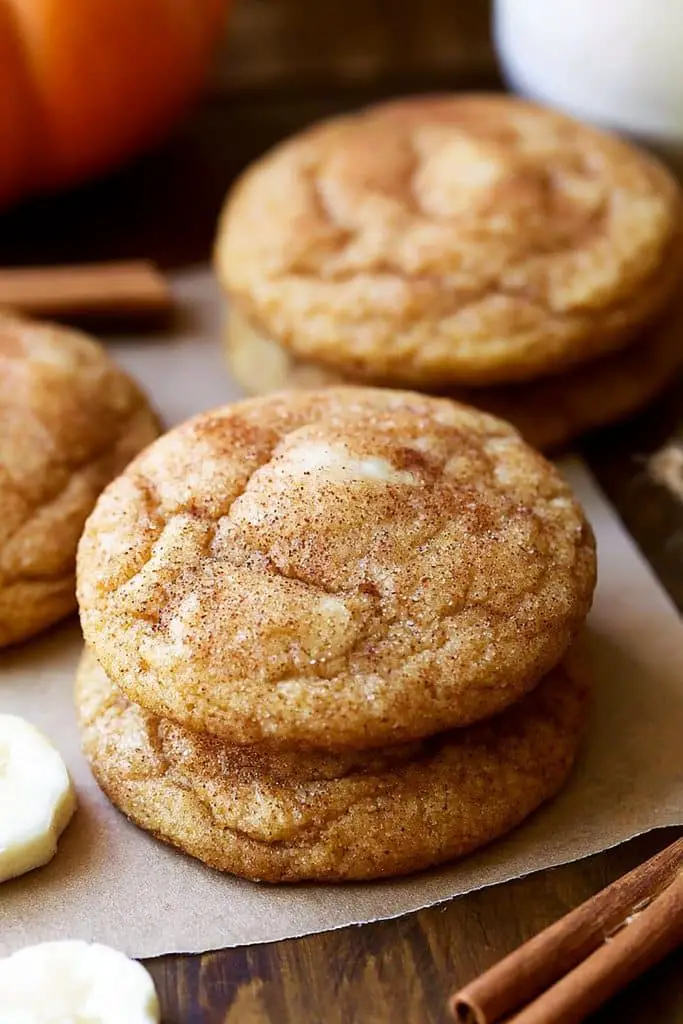
If you love classic snickerdoodles, adding pumpkin and warm fall spices makes them even more special for Thanksgiving. These Pumpkin Spice Snickerdoodles are soft, chewy, and covered in a sweet pumpkin-spiced coating that gives every bite a cozy fall flavor.
I especially like making these during the holiday season because they are simple enough for kids to help with. They can roll the chilled dough into balls and coat each one in the cinnamon-sugar mixture. The recipe is easy, although the dough needs some chilling time before baking.
Prep Time: 15 minutes
Chill Time: 30 minutes
Cook Time: About 11–12 minutes
Difficulty: Easy
Makes: About 18 cookies
Ingredients
For the Cookies
- 1¾ cups all-purpose flour
- 1½ teaspoons pumpkin pie spice
- ½ teaspoon cream of tartar
- ½ teaspoon baking soda
- ½ teaspoon salt
- ½ cup unsalted butter, melted and slightly cooled
- ½ cup granulated sugar
- ½ cup packed light brown sugar
- 1 large egg
- ⅓ cup pure pumpkin purée
- 1 teaspoon vanilla extract
For the Cinnamon-Sugar Coating
- 3 tablespoons granulated sugar
- 1 tablespoon ground cinnamon
How to Make Pumpkin Spice Snickerdoodles
1. Mix the dry ingredients
In a medium bowl, whisk together the flour, pumpkin pie spice, cream of tartar, baking soda, and salt.
Set the bowl aside while you prepare the wet ingredients.
2. Combine the wet ingredients
In a large bowl, whisk the melted butter, granulated sugar, and brown sugar until well combined.
Add the egg, pumpkin purée, and vanilla extract. Mix until the ingredients are smooth and evenly combined.
Make sure you use pure pumpkin purée, not pumpkin pie filling. Pumpkin pie filling already contains added sugar and spices, which can change the texture and flavor of the cookies.
3. Make the cookie dough
Gradually add the dry ingredients to the pumpkin mixture.
Fold everything together just until you no longer see streaks of flour. The dough will be soft and slightly sticky.
Cover the bowl and refrigerate the dough for about 30 minutes. Chilling makes it easier to scoop and roll the cookies.
4. Prepare the cinnamon-sugar coating
While the dough chills, mix the granulated sugar and cinnamon in a small bowl.
This simple coating is what gives these cookies their classic snickerdoodle look and adds a little extra sweetness to the outside.
5. Roll the cookies
Preheat your oven to 350°F and line two baking sheets with parchment paper.
Scoop the chilled dough into small portions and roll each portion between your hands to form a ball.
Roll each dough ball generously in the cinnamon-sugar mixture, making sure the entire outside is coated.
This is a fun step for kids because they can help with the rolling and coating. Just keep a little extra flour nearby if the dough feels sticky.
6. Bake the cookies
Place the coated dough balls on the prepared baking sheets, leaving about 2 inches between them.
Bake for about 11 minutes, or until the edges are set and the centers are just beginning to firm up. The cookies should still feel soft in the middle when you take them out.
Let them cool on the baking sheet for about 10 minutes before transferring them to a wire rack.
Easy Variations
There are several ways to make these Thanksgiving cookies your own. For an even stronger pumpkin-spice flavor, you can add a little extra pumpkin pie spice to the coating. Some established versions use pumpkin pie spice in both the dough and the sugar coating.
You can also add a little ground ginger, nutmeg, or cloves to the dough for a deeper fall flavor. If you want a slightly different texture, some recipes use a higher amount of pumpkin purée for softer, more cakey cookies.
8. Pumpkin Pie Thumbprint Cookies
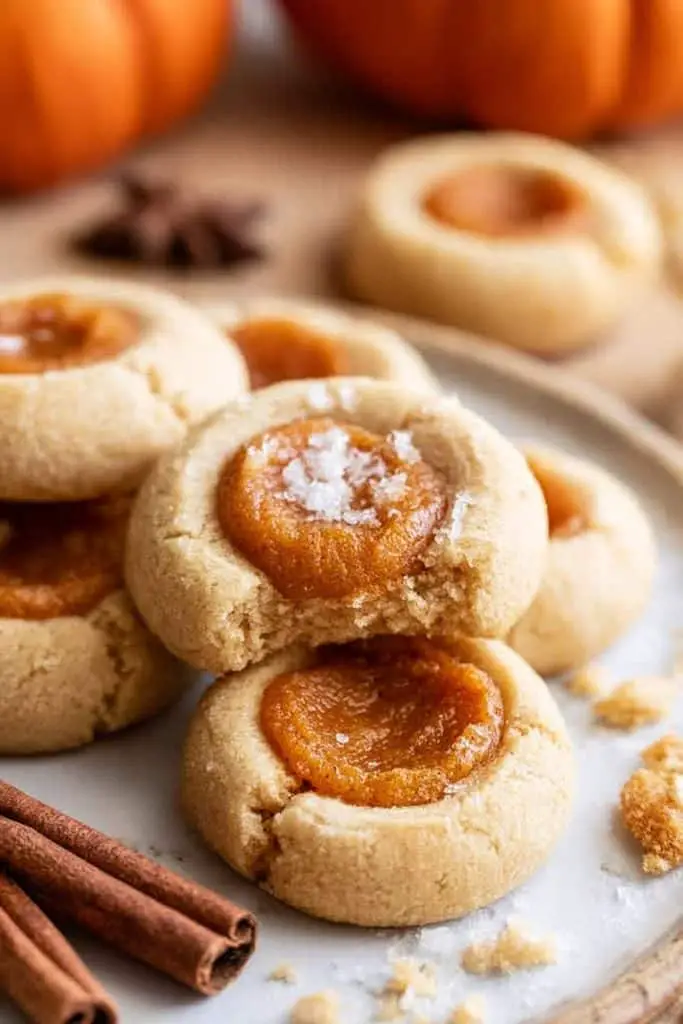
If you love pumpkin pie but want something a little easier to serve, these Pumpkin Pie Thumbprint Cookies are such a fun choice. They have a soft, buttery cookie base with a creamy pumpkin filling right in the center, so each little cookie feels like a bite-sized pumpkin pie.
I especially like these for Thanksgiving because they look special without requiring a complicated decorating technique. Kids can help roll the dough, make the little thumbprint centers, and add the pumpkin filling once the cookies have cooled.
Prep Time: 35 minutes
Chill Time: 20–30 minutes
Cook Time: About 16–18 minutes
Difficulty: Easy
Makes: About 18 cookies
Ingredients
For the Cookies
- 2 cups all-purpose flour
- ½ teaspoon baking powder
- ½ teaspoon salt
- ¾ teaspoon pumpkin pie spice
- 1 cup unsalted butter, softened
- ¾ cup granulated sugar
- 1 large egg
- 1 tablespoon vanilla extract
For the Pumpkin Pie Filling
- ½ cup powdered sugar
- ¼ cup pure pumpkin purée
- 3 ounces cream cheese, softened
- ½ teaspoon vanilla extract
For the Pecan Topping
- 2 tablespoons unsalted butter
- 3 tablespoons finely chopped pecans
- 2 tablespoons light brown sugar
- 2 tablespoons rolled oats
- ¼ teaspoon pumpkin pie spice
How to Make Pumpkin Pie Thumbprint Cookies
1. Make the cookie dough
In a medium bowl, whisk together the flour, baking powder, salt, and pumpkin pie spice.
In a separate large bowl, beat the softened butter and ½ cup of the sugar until light and creamy.
Add the egg and vanilla and mix until everything is well combined. Slowly add the dry ingredients and mix just until a soft dough forms.
2. Shape the cookies
Mix the remaining ¼ cup sugar with ¼ teaspoon pumpkin pie spice in a shallow bowl.
Scoop the dough into small balls, about 1½ inches each. Roll each ball in the spiced sugar and place them on parchment-lined baking sheets, leaving about 2 inches between the cookies.
Now comes the fun part. Use your thumb or the rounded handle of a wooden spoon to gently press an indentation into the center of each dough ball.
If small cracks appear around the edges, simply press them back together with your fingers.
3. Chill the dough
Place the shaped cookies in the refrigerator for about 20–30 minutes.
This helps the dough firm up before baking and allows the thumbprint shape to hold better.
4. Bake the cookies
Preheat the oven to 375°F.
Bake the chilled cookies for about 6 minutes. Remove the baking sheets and gently press the centers again if they have puffed up.
Return the cookies to the oven and bake for another 10–12 minutes, or until the cookies are set and lightly browned underneath.
Let them cool completely on a wire rack before adding the filling.
5. Make the pumpkin filling
While the cookies cool, add the powdered sugar, pumpkin purée, softened cream cheese, and vanilla to a small bowl.
Whisk everything together until smooth and creamy.
Make sure you use pure pumpkin purée rather than pumpkin pie filling. The two products are not interchangeable because pumpkin pie filling already contains added ingredients and spices.
6. Make the pecan crumble
Melt the butter in a small microwave-safe bowl.
Stir in the chopped pecans, brown sugar, rolled oats, and pumpkin pie spice.
Microwave the mixture briefly until the sugar melts, then let it cool until the mixture becomes crunchy.
7. Fill the cookies
Once the cookies are completely cool, spoon about 1–2 teaspoons of pumpkin filling into the center of each cookie.
Finish each one with a small sprinkle of the pecan crumble.
I love this final step because the crunchy topping adds a nice contrast to the soft cookie and creamy pumpkin center.
Easy Variations
There are a few simple ways to change these Thanksgiving cookies. If you want to keep things extra simple, you can skip the pecan crumble and just finish the cookies with the pumpkin filling.
For a nut-free version, leave out the pecans and use extra oats or a little cinnamon-sugar topping instead.
You can also add a tiny pinch of extra pumpkin pie spice to the filling if you want that classic fall flavor to stand out a little more. Other established versions use cinnamon, ginger, and cloves in the pumpkin filling for a more traditional pumpkin-pie taste.
9. Sweet Potato Pie Cookies

If sweet potato pie is one of your favorite Thanksgiving desserts, these Sweet Potato Pie Cookies are such a fun way to enjoy those same cozy flavors in a smaller treat. I love the combination of sweet potato, cinnamon, nutmeg, and crunchy pecans because it tastes just like fall in every bite.
These cookies are a little more involved than some of the no-bake treats in this list, but they are still simple enough to make with older kids. The cookie crust is pressed directly into a mini muffin tin, so there is no rolling or cutting dough. Each little cookie is then filled with creamy sweet potato filling and finished with a buttery pecan crumble.
Prep Time: 35 minutes
Cook Time: About 1 hour 10 minutes
Cooling Time: About 1 hour
Difficulty: Intermediate
Makes: 24 cookies
Ingredients
For the Sweet Potato Filling
- 1 large sweet potato
- ¼ cup light brown sugar
- 2 tablespoons granulated sugar
- 1 large egg
- ¼ cup heavy cream
- ½ teaspoon vanilla extract
- 1 teaspoon ground cinnamon
- ¼ teaspoon ground nutmeg
For the Cookie Crust
- Nonstick cooking spray
- 1¾ cups all-purpose flour
- ½ teaspoon baking powder
- ½ teaspoon ground cinnamon
- ¼ teaspoon ground nutmeg
- ¼ teaspoon kosher salt
- ⅔ cup granulated sugar
- 10 tablespoons unsalted butter, softened
- 1 large egg
- 1 teaspoon vanilla extract
For the Pecan Crumble
- ½ cup all-purpose flour
- ⅓ cup chopped pecans
- ¼ cup light brown sugar
- 2 tablespoons granulated sugar
- ½ teaspoon ground cinnamon
- ½ teaspoon kosher salt
- ¼ teaspoon ground nutmeg
- 4 tablespoons unsalted butter, melted and cooled
How to Make Sweet Potato Pie Cookies
1. Cook the sweet potato
Preheat your oven to 350°F.
Prick the sweet potato several times with a fork and place it on a baking sheet. Bake for about 45–50 minutes, or until it is very tender.
Let it cool enough to handle, then scoop out the flesh and mash it until smooth. Measure out 1 cup of sweet potato purée for the filling.
2. Make the sweet potato filling
Place the sweet potato purée in a bowl and add the brown sugar, granulated sugar, egg, heavy cream, vanilla, cinnamon, and nutmeg.
Whisk everything together until the mixture is smooth and creamy.
Set the filling aside while you prepare the cookie crust.
3. Make the cookie dough
Spray a 24-cup mini muffin tin with nonstick cooking spray.
In a medium bowl, whisk together the flour, baking powder, cinnamon, nutmeg, and salt.
In a separate large bowl, beat the softened butter and granulated sugar until light and fluffy. Add the egg and vanilla and mix until smooth.
Gradually add the dry ingredients and mix just until a soft dough forms.
4. Form the mini cookie crusts
Divide the dough into 24 portions, about 1 tablespoon each.
Roll each portion into a ball and place one into each mini muffin cup.
Press the dough into the bottom and up the sides of each cup to create a small cookie crust. You want enough room in the center for the sweet potato filling.
Place the muffin tin in the refrigerator for about 30 minutes to firm up the crusts.
5. Make the pecan crumble
While the crusts chill, combine the flour, chopped pecans, brown sugar, granulated sugar, cinnamon, salt, and nutmeg in a bowl.
Pour in the melted, cooled butter and mix with a fork until the mixture forms a crumbly texture with both small crumbs and larger pieces.
Spread the crumble over a parchment-lined baking sheet.
Bake it at 350°F for about 15–20 minutes, or until golden and crisp. Let it cool completely.
6. Fill and bake the cookies
Take the chilled cookie crusts out of the refrigerator.
Carefully spoon the sweet potato filling into each crust, filling them evenly without overflowing.
Bake at 350°F for about 25–30 minutes, or until the cookie crusts are golden and the sweet potato filling is set.
7. Add the pecan topping
Let the cookies cool in the muffin tin for about 5–10 minutes before carefully removing them.
Transfer them to a wire rack and gently press some of the cooled pecan crumble onto the top of each cookie.
Let the cookies cool completely before serving.
Easy Variations
The classic version uses pecans in the crumble, but you can leave them out if you need a nut-free option. You can replace them with extra crumble or finely chopped oats for a little texture.
For an even warmer flavor, you can add a little extra cinnamon or a pinch of ginger to the sweet potato filling. If you have leftover baked sweet potato from Thanksgiving dinner, it can also be a convenient way to prepare the filling.
There are other versions of sweet potato pie cookies that use a soft, spiced cookie with sweet potato purée and a simple orange glaze instead of the mini pie-style crust.
10. Pumpkin Pie Cookies With a Cute Whipped Cream Top
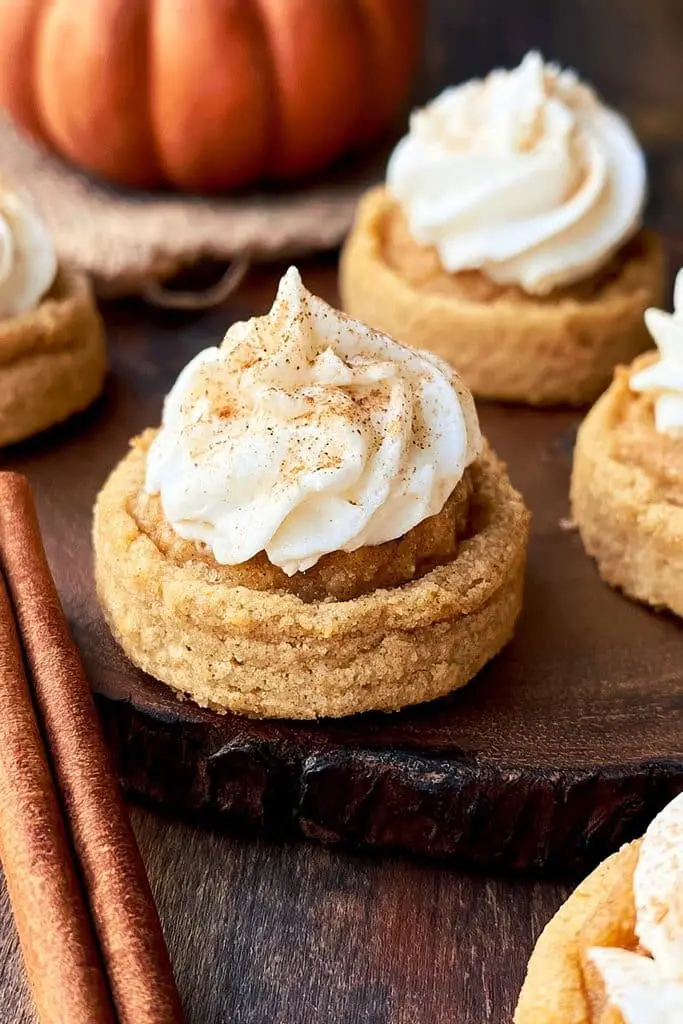
If you love pumpkin pie but want something a little more fun for Thanksgiving, these Pumpkin Pie Cookies With a Cute Whipped Cream Top are such a sweet idea. They have a soft cookie base, creamy pumpkin pie filling, and a little swirl of whipped cream on top that makes them look like tiny individual pumpkin pies.
I love how cute these are without needing complicated decorating skills. The cookie dough is easy to shape, and kids can help make the little wells for the pumpkin filling. The whipped cream topping is the final touch that makes these cookies feel extra special.
Prep Time: About 30 minutes
Chill Time: About 30 minutes
Cook Time: 20–25 minutes
Difficulty: Easy to moderate
Makes: About 24 cookies
Ingredients
For the Cookie Base
- 1½ cups all-purpose flour
- ½ teaspoon baking powder
- ½ teaspoon salt
- ½ teaspoon pumpkin pie spice
- ½ cup unsalted butter, softened
- ½ cup granulated sugar
- ¼ cup packed brown sugar
- 1 large egg yolk
- 1 teaspoon vanilla extract
For the Pumpkin Filling
- ½ cup pure pumpkin purée
- ¼ cup brown sugar
- 1 large egg
- 1 tablespoon evaporated milk
- 2 tablespoons all-purpose flour
- 1 teaspoon pumpkin pie spice
For the Whipped Cream
- ½ cup heavy whipping cream, chilled
- 3 tablespoons powdered sugar
- ½ teaspoon vanilla extract
- A little cinnamon or pumpkin pie spice, for sprinkling
How to Make Pumpkin Pie Cookies
1. Make the cookie dough
In a medium bowl, whisk together the flour, baking powder, salt, and pumpkin pie spice.
In a separate large bowl, beat the softened butter, granulated sugar, and brown sugar until creamy and fluffy.
Add the egg yolk and vanilla extract and mix until everything is well combined. Gradually add the dry ingredients and mix until a soft dough forms.
2. Chill the dough
Cover the dough and refrigerate it for about 30 minutes.
Chilling helps make the dough easier to handle and gives the cookies a better shape when they bake.
3. Shape the cookies
Preheat the oven to 350°F and line a baking sheet with parchment paper.
Scoop the dough into portions of about 2 tablespoons each and roll them into balls. Place them on the prepared baking sheet, leaving a little space between each cookie.
Use the bottom of a tablespoon or another small rounded measuring spoon to gently press a well into the center of each dough ball. This little space will hold the pumpkin filling.
4. Make the pumpkin filling
In a medium bowl, whisk together the pumpkin purée, brown sugar, egg, evaporated milk, flour, and pumpkin pie spice.
Mix until the filling is smooth and there are no large lumps.
Remember to use pure pumpkin purée, not pumpkin pie filling. Pumpkin purée gives you a plain pumpkin base so you can control the sugar and spices yourself.
5. Fill the cookies
Spoon a small amount of pumpkin filling into the center of each cookie.
Do not overfill them. Leave a little room around the edges because the filling will spread slightly as it bakes.
This is a fun step for kids because they can carefully spoon the pumpkin mixture into each little cookie cup.
6. Bake the cookies
Bake the cookies for about 14–17 minutes, or until the cookie edges are set and lightly golden.
The pumpkin filling should look set but still soft in the center.
Let the cookies cool on the baking sheet for a few minutes, then transfer them to a wire rack and allow them to cool completely.
7. Make the whipped cream
Place the cold heavy cream, powdered sugar, and vanilla extract in a chilled mixing bowl.
Beat with an electric mixer until the cream reaches stiff peaks.
Be careful not to overbeat it. You want the whipped cream to be smooth and fluffy enough to pipe or spoon onto the cookies.
8. Add the cute whipped cream top
Once the cookies are completely cool, transfer the whipped cream to a piping bag fitted with a star tip.
Pipe a small swirl or dollop of whipped cream onto the center of each cookie.
Finish with a light sprinkle of cinnamon or pumpkin pie spice. This little touch makes them look even more like miniature pumpkin pies.
Easy Variations
There are a few simple ways to change these Thanksgiving cookies. If you do not have a piping bag, simply spoon a small dollop of whipped cream onto each cookie. They will still look adorable.
You can also use store-bought whipped topping when you want to save a little time. Some established pumpkin pie cookie recipes specifically recommend either homemade whipped cream or store-bought whipped topping.
For a little extra texture, add a tiny sprinkle of chopped pecans or crushed gingersnaps over the whipped cream. A light dusting of pumpkin pie spice is my favorite because it keeps the cookies looking simple and festive.
11. Two-Ingredient Thanksgiving Turkey Cookies

When I want to make something festive without spending much time in the kitchen, these Two-Ingredient Thanksgiving Turkey Cookies are one of the easiest choices. You really only need two types of refrigerated cookie dough, and the result is a cute turkey cookie sitting on top of a soft chocolate chip cookie.
I especially like this recipe for busy Thanksgiving days because there is no homemade dough to mix and no complicated decorating. Kids can help place the turkey shapes on the chocolate chip dough before the cookies go into the oven.
Prep Time: 15 minutes
Cook Time: 10–12 minutes
Difficulty: Very easy
Makes: About 20 cookies
Ingredients
- 1 roll refrigerated chocolate chip cookie dough, preferably a value-size package
- 1 package ready-to-bake turkey-shaped sugar cookie dough
How to Make Two-Ingredient Thanksgiving Turkey Cookies
1. Prepare the baking sheet
Preheat your oven according to the directions on the cookie dough packages.
Line a baking sheet with parchment paper or lightly grease it so the cookies are easy to remove after baking.
2. Slice the chocolate chip dough
Take the refrigerated chocolate chip cookie dough and cut it into slices about ¼-inch thick.
Place the slices on the prepared baking sheet, leaving enough room between them for the cookies to spread as they bake.
3. Add the turkey shapes
Take one ready-to-bake turkey-shaped sugar cookie and gently place it on top of each chocolate chip cookie dough slice.
There is no need to press the turkey shape deeply into the dough. Just make sure it sits securely on top.
This is the part kids can easily help with. I like giving them the job of matching one turkey shape to each chocolate chip cookie.
4. Bake the cookies
Bake the cookies for about 10–12 minutes, or until the edges of the chocolate chip cookies are just beginning to turn golden brown.
Keep an eye on them toward the end because oven temperatures and cookie dough thickness can vary. The center should be baked through rather than raw.
5. Cool the cookies
Remove the baking sheet from the oven and let the cookies cool for a few minutes.
Carefully transfer them to a wire rack and allow them to cool completely before serving.
As the cookies cool, the chocolate chip base will firm up while the turkey shape stays right on top.
Easy Variations
The original two-ingredient version is already incredibly simple, but you can make a few small changes depending on what you can find.
If turkey-shaped sugar cookie dough is unavailable, you can use another ready-to-bake Thanksgiving-shaped sugar cookie dough. The important part is choosing a shape that fits nicely on top of the chocolate chip cookie base.
You can also make smaller cookies by cutting the chocolate chip dough into thinner portions. Just keep an eye on the baking time because smaller cookies may bake more quickly.
Storage
Once completely cooled, store the cookies in an airtight container at room temperature for up to about one week. The documented recipe also notes that they can be frozen for roughly 2–3 months.
12. Thankful Sugar Cookies for Thanksgiving

I love the idea of turning a simple sugar cookie into something meaningful, and these Thankful Sugar Cookies are perfect for Thanksgiving. Instead of just decorating cookies with sprinkles, everyone can write down something they are thankful for and turn dessert into a little gratitude activity.
The cookies themselves are simple, but you do need some time for the dough to chill and the icing to set. Kids can help roll and cut the cookies, then decorate them with icing and write their own thankful messages once the cookies are ready. This makes them a lovely choice when you want Thanksgiving cookies kids can make and enjoy together.
Prep Time: 25 minutes
Chill Time: About 1 hour
Cook Time: 8–10 minutes
Icing Time: 20–30 minutes, plus drying time
Difficulty: Easy to moderate
Makes: About 24 cookies
Ingredients
For the Sugar Cookies
- 3 cups all-purpose flour
- 2 teaspoons baking powder
- ½ teaspoon ground cinnamon
- ¼ teaspoon ground ginger
- ⅛ teaspoon ground nutmeg
- ⅛ teaspoon allspice
- 1 cup granulated sugar
- 1 cup unsalted butter, softened
- 1 large egg
- 1 teaspoon vanilla extract
For the Simple Icing
- 3 cups powdered sugar
- 2–3 tablespoons milk or water
- ½ teaspoon vanilla extract
- Orange, yellow, red, or brown food coloring, optional
For Decorating
- Edible food-safe markers
- Fall-colored sprinkles, optional
- Small candies, optional
How to Make Thankful Sugar Cookies
1. Make the cookie dough
In a medium bowl, whisk together the flour, baking powder, cinnamon, ginger, nutmeg, and allspice.
In a large bowl, beat the softened butter and sugar until light and creamy. Add the egg and vanilla extract and mix until smooth.
Gradually add the dry ingredients to the butter mixture. Mix just until a soft dough forms.
2. Chill the dough
Divide the dough into two portions and flatten each one into a disk.
Wrap the dough and refrigerate it for about 1 hour. Chilling makes the dough easier to roll and helps the cookies hold their shape while baking.
3. Roll and cut the cookies
Preheat your oven to 350°F and line baking sheets with parchment paper.
Lightly flour your work surface and roll the dough to about ¼-inch thickness.
Use round, leaf, pumpkin, or another Thanksgiving-themed cookie cutter to cut out the cookies. Place them on the prepared baking sheets, leaving a little space between each cookie.
This is a great job for kids because they can choose their favorite shapes and help press the cutters into the dough.
4. Bake the cookies
Bake the cookies for about 8–10 minutes, or until the edges are lightly golden.
Try not to overbake them. You want the cookies to stay soft enough to decorate and write on after they cool.
Let the cookies cool on the baking sheet for a few minutes, then transfer them to a wire rack and allow them to cool completely.
5. Decorate with icing
Prepare a simple icing by mixing the powdered sugar, milk or water, and vanilla until smooth.
Add a little food coloring if you want colorful Thanksgiving cookies. Orange, yellow, and brown work especially well for a fall theme.
Spread or pipe a thin layer of icing over each cooled cookie. Let the icing dry until the surface is firm enough to write on.
6. Write something you are thankful for
Once the icing has dried, give each person an edible food-safe marker.
Now comes my favorite part. Everyone can write one thing they are thankful for directly on their cookie.
You can keep it simple with words such as “family,” “friends,” “home,” or “kindness,” or let kids write a full little message.
This idea has been used as a Thanksgiving family activity where blank decorated cookies are placed out and everyone writes something they are thankful for.
7. Add a few finishing touches
If you want the cookies to look more festive, add a few fall-colored sprinkles or small candies around the edges.
You can also make a mixture of different shapes. I especially like using leaves, pumpkins, and simple round cookies because they give the dessert plate a nice Thanksgiving look.
Easy Variations
You do not have to make every cookie say “thankful.” You can let each person choose their own word or message.
For younger kids who may not be ready to write with an edible marker, give them sprinkles and small candies instead. They can decorate the cookies while an older child or adult writes the thankful messages.
Another fun idea is to make larger cookies and turn them into little Thanksgiving place cards. Guests can write something they are thankful for and then take the cookie home after the meal.
You can also use a favorite plain sugar-cookie recipe instead of the spiced version above. The important part is having a smooth, light-colored surface that makes the thankful messages easy to see.