
01. Mummy Jalapeño Poppers
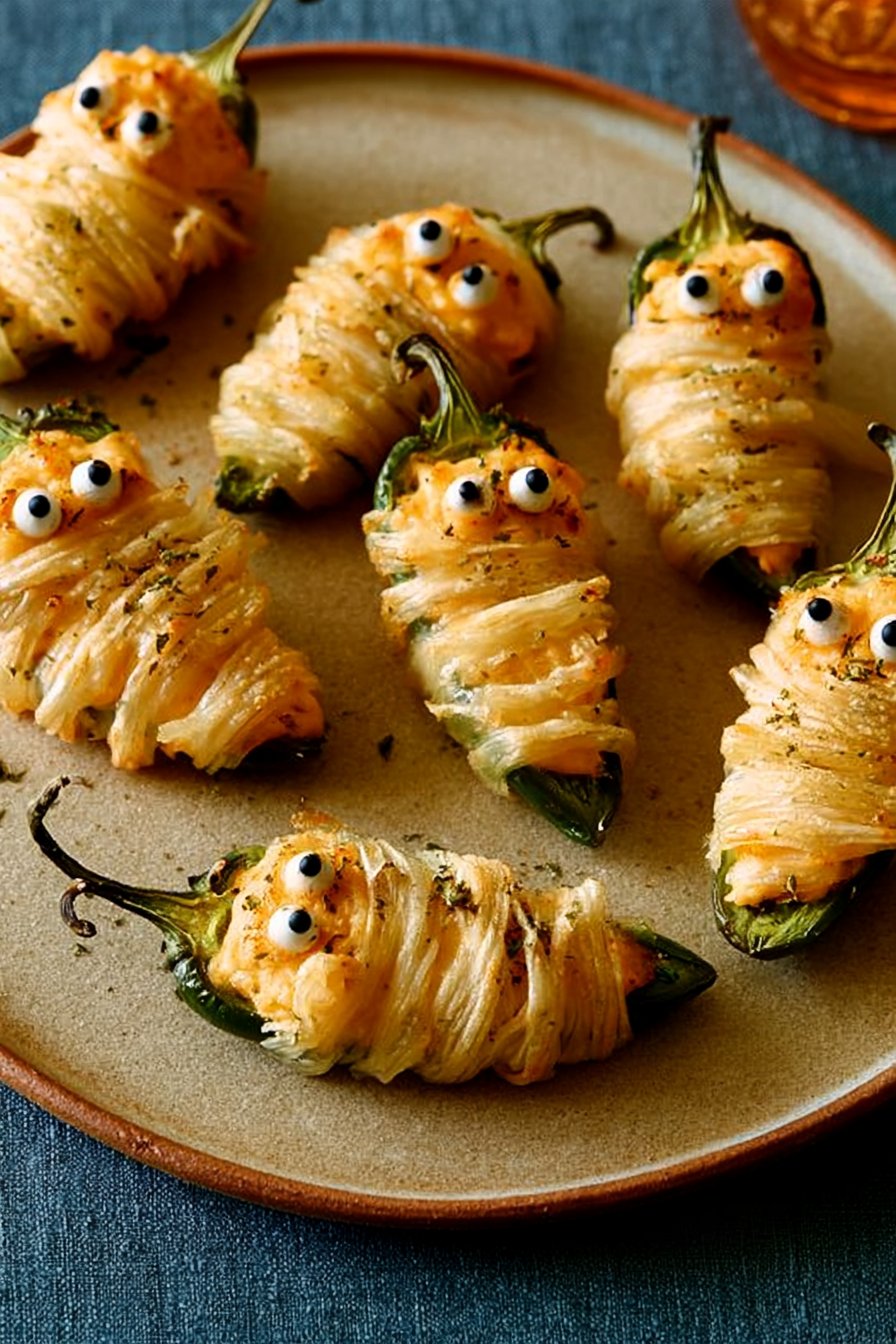
If I had to choose one appetizer to start a Halloween party with, these mummy jalapeño poppers would be high on my list. They take the familiar cheesy jalapeño popper and give it a spooky little makeover with crescent-roll “bandages.” The result is crispy on the outside, creamy and cheesy inside, with just enough heat to make them interesting for adults.
Prep time: 40 minutes
Cook time: 13–18 minutes
Total time: About 1 hour
Difficulty: Easy
Yield: About 20 poppers
The filling can easily be changed depending on how spicy you like your food. Removing the jalapeño seeds makes them milder, while pepper Jack, chili powder, or a little hot sauce can give them more heat. The poppers can also be assembled ahead of time and refrigerated until you’re ready to bake them.
Ingredients
- 4 slices bacon, finely chopped
- 6 ounces cream cheese, softened, plus 1 tablespoon for decorating
- 1½ cups finely shredded Cheddar Jack cheese
- 2 scallions, thinly sliced
- 1 garlic clove, finely grated
- ¼ teaspoon salt
- 10 medium to large jalapeños
- 1 tube refrigerated crescent-roll dough, about 8 ounces
- 1 large egg, beaten
- 4–5 black olives, for the mummy eyes
How to Make Mummy Jalapeño Poppers
- Prepare the oven.
Preheat your oven to 400°F (200°C). Line a large baking sheet with parchment paper. - Cook the bacon.
Add the chopped bacon to a skillet over medium heat. Cook for about 8–10 minutes, stirring occasionally, until browned and crisp. Transfer it to a paper towel-lined plate to remove excess grease. - Make the filling.
In a bowl, combine the cooked bacon, softened cream cheese, Cheddar Jack cheese, scallions, garlic, and salt. Mix until everything is evenly combined. - Prepare the jalapeños.
Cut each jalapeño in half lengthwise, keeping the stem attached if possible. Remove the seeds and inner membranes with a small spoon. If you want your poppers hotter, leave some of the membranes in place. - Fill the peppers.
Spoon the cheese mixture into each jalapeño half. Smooth the top so the filling is roughly level with the edges of the pepper. - Create the mummy bandages.
Unroll the crescent dough and separate it into rectangles. Seal the perforations, then cut the dough lengthwise into thin strips. - Wrap the mummies.
Wrap each stuffed jalapeño with two strips of dough, leaving small gaps between the strips so the filling can still be seen. Don’t worry about making them perfectly neat—slightly messy bandages actually make them look more like mummies. - Brush and bake.
Arrange the wrapped jalapeños on the prepared baking sheet. Brush the dough lightly with beaten egg. Bake for 13–18 minutes, or until the dough is golden brown and the filling is hot and bubbly. - Add the eyes.
Let the poppers cool for a few minutes. Place a couple of tiny dots of cream cheese on each mummy and add small pieces of black olive for the pupils. - Serve warm.
Arrange them on a platter and serve while they’re still warm and cheesy.
My Tip
If you’re making these for an adult Halloween party, I like offering two versions: one mild batch with the seeds removed and another spicy batch with pepper Jack cheese and a little hot sauce. That way, everyone can enjoy them.
And don’t worry if your mummy bandages aren’t perfect. In fact, the slightly uneven ones usually look the creepiest.
These are one of those spooky appetizers where the presentation does most of the work. You’re basically taking a classic jalapeño popper and turning it into fun creepy food for Halloween with a few strips of pastry and some black olives.
Next up is Spider Deviled Eggs, a simple classic that fits perfectly into a Halloween spread without requiring complicated ingredients or techniques.
02. Spider Deviled Eggs
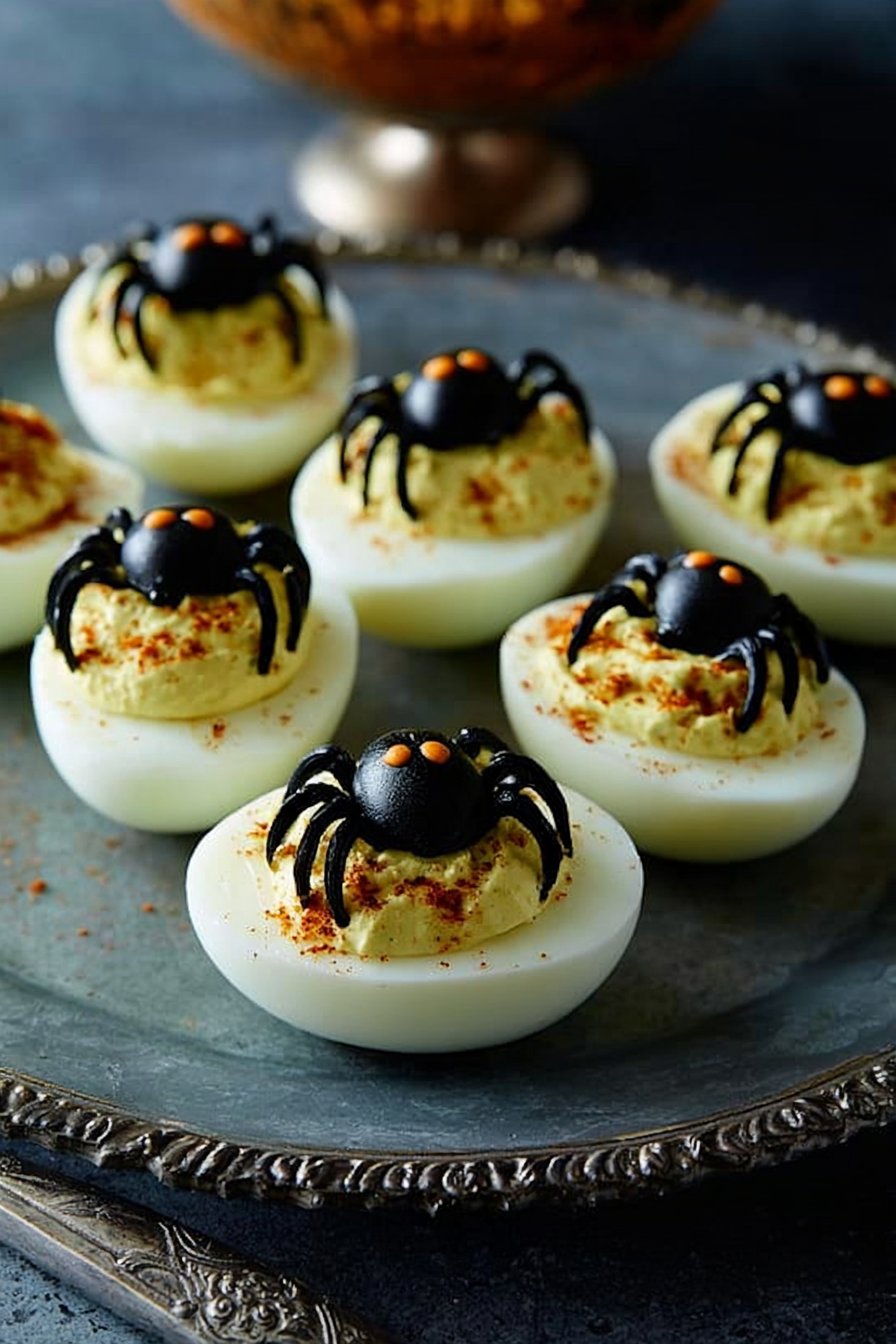
These Spider Deviled Eggs are one of my favorite Halloween appetizers when I want something that looks creepy but still feels like a familiar party favorite. Creamy deviled egg filling is topped with black olive pieces arranged to look like little spiders, making them perfect Halloween finger foods for an adults-only gathering.
Prep time: 20 minutes
Cook time: 12 minutes
Total time: About 35 minutes
Difficulty: Easy
Yield: 12 deviled eggs
Ingredients
- 6 large eggs
- 3 tablespoons mayonnaise
- 1 teaspoon yellow or Dijon mustard
- 1 teaspoon pickle juice or white vinegar
- ⅛ teaspoon salt
- ⅛ teaspoon black pepper
- ¼ teaspoon paprika, plus extra for garnish
- 6–8 black olives, preferably pitted
- Fresh chives or parsley, optional, for garnish
How to Make Spider Deviled Eggs
- Boil the eggs.
Place the eggs in a saucepan and cover them with cold water. Bring the water to a boil over medium-high heat. Once boiling, cover the pan, remove it from the heat, and let the eggs sit for about 10–12 minutes. - Cool the eggs.
Transfer the cooked eggs to a bowl of ice water and let them cool for at least 5 minutes. This stops the cooking process and also makes peeling easier. - Peel and cut the eggs.
Carefully peel the eggs and rinse away any small pieces of shell. Slice each egg in half lengthwise. - Make the filling.
Gently remove the yolks and place them in a small bowl. Add mayonnaise, mustard, pickle juice or vinegar, salt, pepper, and paprika. Mash everything together until smooth and creamy. - Fill the egg whites.
Spoon the yolk mixture back into the egg-white halves. For a neater presentation, you can also transfer the filling to a piping bag or zip-top bag, snip off the corner, and pipe it into the eggs. - Make the olive spiders.
Slice some of the black olives in half. Use one half as the spider’s body. Cut the remaining olive pieces into thin strips to make the spider’s legs. - Decorate the eggs.
Place one olive half in the center of each deviled egg. Arrange four thin olive strips on each side to create the spider legs. - Finish and serve.
Sprinkle the eggs lightly with paprika and add a little chopped chive or parsley around the platter if you like. Keep refrigerated until you’re ready to serve.
My Tip
Make the deviled eggs a few hours before the party, but add the olive spiders closer to serving time. This keeps the decorations looking fresh and makes the platter look its best.
If you’re serving these as part of a larger selection of Halloween party food ideas, I recommend placing them on a dark platter or black serving board. The white eggs and black olive spiders really stand out.
And if you’re looking for easy Halloween appetizers ideas, don’t overlook recipes like this. You don’t need special Halloween ingredients or complicated decorations. A few black olives can turn an ordinary deviled egg into creepy little spiders, and that’s exactly the kind of simple Halloween food idea I love for a party.
03. Halloween Charcuterie Board
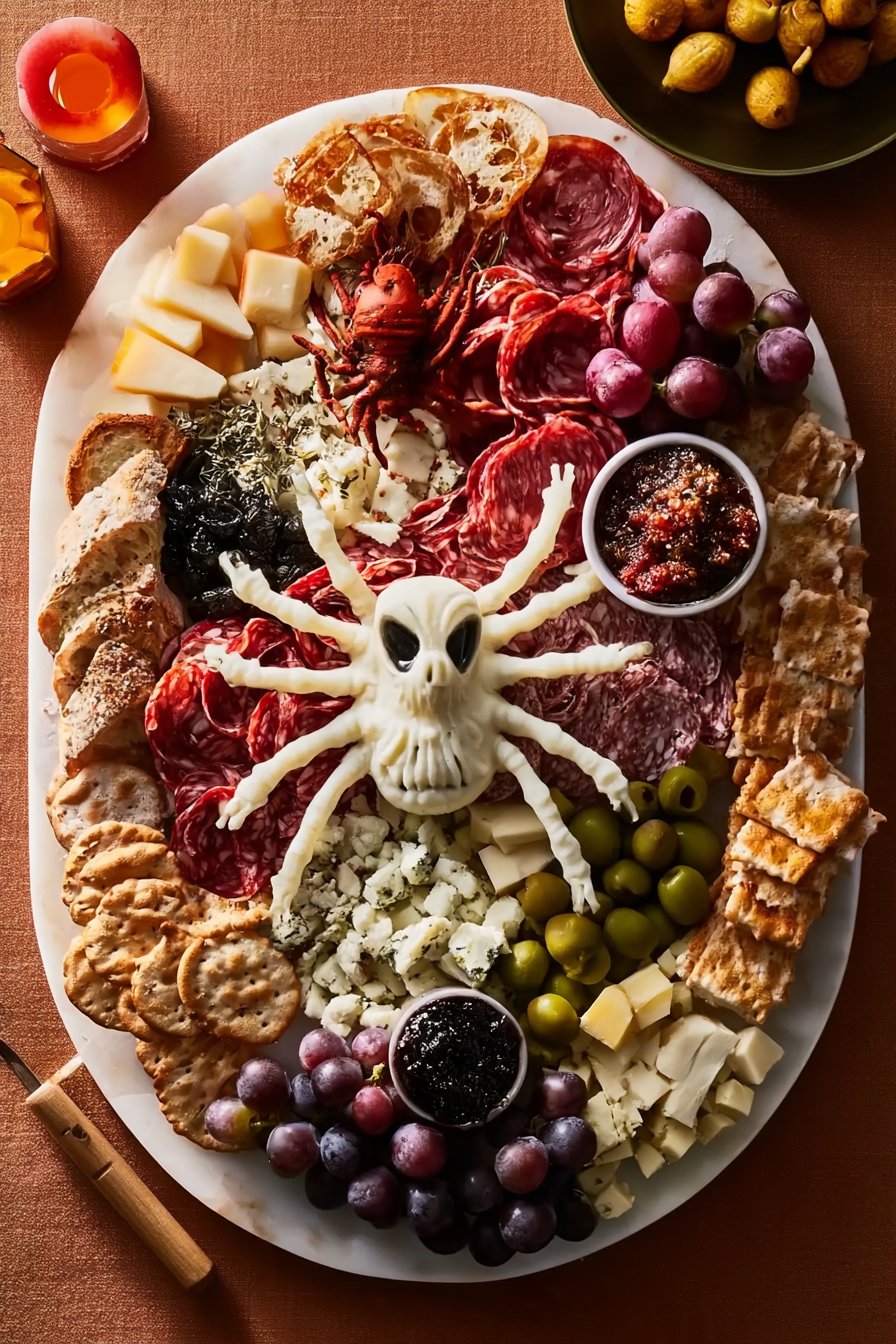
A Halloween Charcuterie Board is one of the easiest ways to feed a group of adults without spending hours cooking. Instead of making several complicated appetizers, you can arrange cured meats, cheeses, crackers, olives, fruit, and a few spooky touches on one large board. It looks impressive, but the actual preparation is mostly slicing and arranging.
Prep time: 25–30 minutes
Cook time: None
Total time: About 30 minutes
Difficulty: Very easy
Servings: 8–10 people as an appetizer
The best thing about this board is that there really isn’t one strict recipe. You can change the ingredients based on what you enjoy or what you already have in the refrigerator. For an adults-only Halloween party, I like combining creamy cheese, sharp cheese, salty meats, olives, nuts, and something sweet so there is a little bit of everything.
Ingredients
Cheese
- 4 ounces Brie or Camembert
- 4 ounces sharp Cheddar, sliced or cubed
- 4 ounces Gouda or smoked Gouda
- 3–4 ounces goat cheese or another soft cheese
Meat
- 3–4 ounces salami
- 3–4 ounces prosciutto
- 3–4 ounces pepperoni or another cured meat
Crackers and Bread
- 1–2 cups assorted crackers
- Sliced baguette or toasted crostini, optional
- Breadsticks, optional
Fruits
- 1 cup seedless grapes
- 1 apple, thinly sliced
- ½ cup dried cranberries
- Fresh figs or pears, optional
Extras
- ½ cup black and green olives
- ½ cup almonds or walnuts
- Small bowl of honey or fruit preserves
- Cornichons or small pickles
- Fresh rosemary or thyme, for garnish
Halloween Decorations
- Black or orange serving napkins
- Small Halloween-themed serving picks
- A few small decorative pumpkins, placed around the board rather than directly on the food
How to Make a Halloween Charcuterie Board
- Choose your board.
Start with a large wooden board, slate board, or large serving platter. Make sure it has enough room for all the ingredients without overcrowding. - Place the larger items first.
Put the Brie, goat cheese, or other larger cheese pieces on the board first. If you’re serving honey or preserves, place them in a small bowl and add the bowl to the board. - Arrange the meats.
Fold slices of salami or prosciutto into loose rolls or small folds. You can also arrange salami slices into a simple rose shape for a more decorative look. - Add the remaining cheese.
Cut Cheddar and Gouda into cubes, triangles, or thin slices. Spread the different cheeses around the board rather than keeping them all in one place. - Fill the empty spaces with crackers.
Arrange crackers around the cheeses and meats. Keep some in small stacks and fan some out for a more relaxed appearance. - Add fruit.
Place small clusters of grapes around the board. Add apple slices, figs, pears, or dried cranberries to introduce some sweetness and color. - Add olives, nuts, and pickles.
Use small bowls for anything that could make the crackers or cheese wet. Olives, nuts, and pickles are especially good for filling small gaps. - Give it a Halloween look.
This is where an ordinary charcuterie board becomes one of your Halloween appetizers. Use mostly dark, orange, red, and white foods where possible. You can also arrange black olives into simple spider shapes or use Halloween-themed picks. - Add the finishing touches.
Tuck a few small rosemary or thyme sprigs between the food. Keep decorative items around the board rather than touching the food. - Serve.
Put the board out shortly before your guests arrive. Serve with small cheese knives, tongs, and extra napkins.
Easy Variations
You can make this board completely your own.
For a cheese-heavy board:
Add extra Brie, Cheddar, Gouda, blue cheese, and goat cheese.
For a meat-lovers board:
Add pepperoni, salami, prosciutto, smoked sausage, and other cured meats.
For a vegetarian board:
Skip the meat and add extra cheeses, roasted vegetables, hummus, nuts, olives, and fruit.
For a spicy board:
Add pepper Jack cheese, spicy salami, pickled jalapeños, and a spicy dip.
My Tip
Don’t feel like you need to buy ten different types of cheese and meat. Three or four cheeses, two or three meats, crackers, fruit, olives, and one dip are more than enough. The secret to a beautiful charcuterie board is arranging everything nicely and filling the little empty spaces.
For an adults-only gathering, this is one of my favorite Halloween party food ideas because guests can keep coming back to the board throughout the evening. It also gives you a nice break from serving only hot food.
If you’re putting together several Halloween finger foods, I would make this board alongside one or two hot appetizers, such as mummy jalapeño poppers or mummy pigs in a blanket. That gives you a good mix of fresh, creamy, salty, cheesy, and warm foods without making the entire menu too complicated.
And honestly, a Halloween charcuterie board is proof that spooky appetizers don’t always have to look creepy. Sometimes a dark, dramatic board filled with good cheese, cured meats, olives, and fruit is all you need to make your Halloween spread feel special.
04. Pumpkin-Shaped Cheese Ball
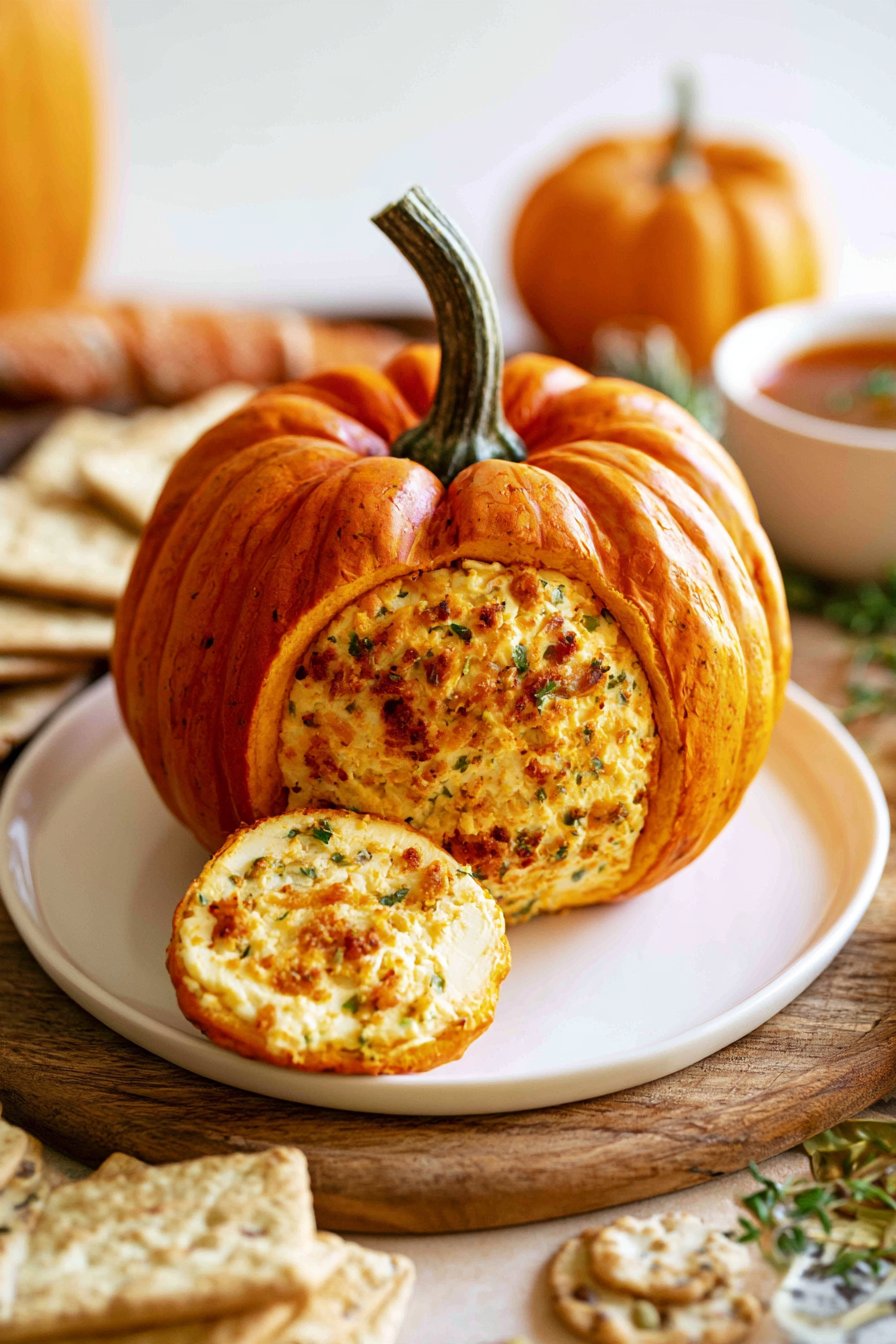
A Pumpkin-Shaped Cheese Ball is one of those Halloween appetizers that looks much more complicated than it really is. You simply mix a few creamy and savory ingredients, shape the mixture into a pumpkin, and add a few simple details to finish the look. It is perfect for adults because it feels like a proper party appetizer while still bringing plenty of Halloween fun to the table.
Prep time: 20 minutes
Chill time: 2 hours
Cook time: None
Total time: About 2 hours 20 minutes
Difficulty: Easy
Servings: 8–10
The basic cheese ball is made with cream cheese and Cheddar, but you can change the flavor with herbs, garlic, jalapeños, bacon, or different cheeses. For a Halloween party, the pumpkin shape and orange color are what make it special.
Ingredients
- 16 ounces cream cheese, softened
- 1½ cups finely shredded sharp Cheddar cheese
- ½ cup finely shredded Parmesan cheese
- 2 tablespoons finely chopped fresh chives
- 1 tablespoon finely chopped fresh parsley
- 1 teaspoon garlic powder
- ½ teaspoon onion powder
- ½ teaspoon smoked paprika
- ¼ teaspoon black pepper
- ¼ teaspoon salt, or to taste
- 2 tablespoons Worcestershire sauce
- 1 tablespoon hot sauce, optional
- ½ cup finely chopped pecans or walnuts, optional
- 1 small piece of celery or a pretzel stick, for the pumpkin stem
- Crackers, pretzels, cucumber slices, and vegetables for serving
How to Make a Pumpkin-Shaped Cheese Ball
- Soften the cream cheese.
Let the cream cheese sit at room temperature until it is soft enough to mix easily. This helps create a smooth cheese ball without lumps. - Mix the cheese filling.
Add the softened cream cheese, Cheddar, Parmesan, chives, parsley, garlic powder, onion powder, smoked paprika, black pepper, salt, and Worcestershire sauce to a large bowl. - Add some heat if you like.
For a slightly spicy version, mix in a tablespoon of hot sauce. You can also add finely chopped jalapeño or a pinch of cayenne pepper if you want more heat. - Combine everything well.
Mix until all the ingredients are evenly distributed and the mixture is creamy and thick. - Shape the cheese ball.
Place a large sheet of plastic wrap on your work surface. Spoon the cheese mixture into the center and gather the plastic wrap around it. Shape the mixture into a round ball. - Create the pumpkin shape.
Gently press the ball so it becomes slightly wider and flatter, more like a pumpkin than a perfect sphere. - Make the pumpkin ridges.
Wrap the cheese ball tightly in plastic wrap. Using your fingers or a piece of kitchen twine, gently press several vertical grooves around the cheese ball. Don’t press too deeply, you just want enough of an indentation to create the pumpkin shape. - Chill.
Refrigerate the wrapped cheese ball for at least 2 hours. Chilling allows the cheese to firm up and makes it much easier to handle. - Add the coating.
If you want a little extra texture, finely chopped pecans or walnuts can be gently pressed onto the outside. You can also leave the cheese ball smooth and let the orange color and pumpkin shape do the decorating. - Add the stem.
Just before serving, place a small piece of celery or a pretzel stick on top to look like the pumpkin stem. - Serve.
Transfer the pumpkin cheese ball to a serving board or platter. Arrange crackers, pretzels, sliced vegetables, and fruit around it.
Easy Variations
Bacon Cheddar Pumpkin:
Mix finely cooked and crumbled bacon into the cheese mixture for a smoky, savory version.
Spicy Pumpkin Cheese Ball:
Add diced jalapeño, cayenne pepper, or extra hot sauce.
Herb and Garlic:
Increase the fresh herbs and garlic for a fresher, more savory flavor.
Everything Bagel:
Replace some of the herbs and spices with everything bagel seasoning and serve with crackers or toasted bread.
My Tip
Make this cheese ball the day before your Halloween party if you can. The flavors have more time to come together, and the cheese ball will be firm enough to hold its pumpkin shape.
I also recommend preparing the crackers and vegetables separately and arranging them around the cheese ball just before serving. That keeps everything crisp and fresh.
If you’re putting together several Halloween appetizers for party adults, this one is especially useful because it can sit at the center of your appetizer table while guests help themselves. It also balances out heavier Halloween finger foods such as mummy jalapeño poppers and pigs in a blanket.
And don’t worry about making the pumpkin perfectly shaped. A few uneven ridges actually make it look more natural. With just a little smoked paprika, a simple stem, and some crackers around the sides, an ordinary cheese ball turns into one of those fun Halloween appetizers ideas that looks festive without requiring a lot of work.
05. Pumpkin Puff Pastry Bites

I like using puff pastry to make little pumpkin-shaped bites filled with creamy cheese and savory herbs. They look festive on a platter but don’t require complicated decorating or special cooking skills.
Prep time: 20 minutes
Cook time: 15–18 minutes
Total time: About 40 minutes
Difficulty: Easy
Servings: 12–16 bites
You can make these with a simple cheese filling, or add cooked spinach, chicken, mushrooms, or even a little spicy sausage. For this recipe, I keep the filling savory so the bites work well alongside other Halloween appetizers.
Ingredients
- 1 sheet frozen puff pastry, thawed
- 4 ounces cream cheese, softened
- ½ cup shredded Cheddar cheese
- ¼ cup grated Parmesan cheese
- 1 tablespoon chopped fresh parsley
- ½ teaspoon garlic powder
- ¼ teaspoon Italian seasoning
- ¼ teaspoon black pepper
- 1 egg, beaten, for brushing
- 1 tablespoon olive oil or melted butter
For the Pumpkin Decoration
- Small pumpkin-shaped cookie cutter
- Thin strips of green bell pepper or fresh chives, optional
- A little paprika, optional
How to Make Pumpkin Puff Pastry Bites
- Preheat the oven.
Preheat your oven to 400°F (200°C). Line a baking sheet with parchment paper. - Prepare the filling.
In a bowl, mix the cream cheese, Cheddar, Parmesan, parsley, garlic powder, Italian seasoning, and black pepper until well combined. - Roll out the pastry.
Place the thawed puff pastry on a lightly floured surface and gently roll it out until smooth. - Cut the pumpkin shapes.
Use a small pumpkin-shaped cookie cutter to cut as many shapes as possible from the pastry. Gather the scraps, gently roll them again, and cut additional shapes. - Add the filling.
Place a small spoonful of the cheese mixture in the center of half of the pumpkin shapes. Don’t add too much filling or it may leak out during baking. - Cover the bites.
Place another pumpkin-shaped piece of puff pastry over each filled piece. Press the edges gently with your fingers to seal. - Create pumpkin details.
Use the back of a knife to make a few shallow curved lines on the top pastry layer. Be careful not to cut all the way through. - Brush with egg.
Arrange the pastry bites on the prepared baking sheet. Brush the tops lightly with beaten egg and drizzle or brush with a little olive oil or melted butter. - Bake.
Bake for 15–18 minutes, or until the puff pastry is puffed and golden brown. - Add the stems.
While the bites are still warm, add tiny strips of green bell pepper or fresh chives at the top to resemble pumpkin stems. - Serve.
Let them cool for a few minutes before transferring them to a serving platter.
Easy Variations
Spinach and Cheese:
Add finely chopped cooked spinach to the cream cheese filling.
Chicken and Cheese:
Mix finely chopped cooked chicken into the filling for a more substantial appetizer.
Spicy Pumpkin Bites:
Add chopped jalapeño, chili flakes, or a pinch of cayenne pepper.
Mushroom and Herb:
Add finely chopped sautéed mushrooms with extra parsley or thyme.
Pizza Pumpkin Bites:
Replace the cheese filling with a small amount of pizza sauce, mozzarella, and chopped pepperoni.
My Tip
The biggest trick is to keep the filling small and centered. Puff pastry expands quite a bit in the oven, and too much filling can push through the sides and spoil the pumpkin shape.
Keep the pastry cold while you’re working with it. If it becomes soft or sticky, place it in the refrigerator for a few minutes before cutting and assembling the bites.
You can also prepare the filled, unbaked pastries ahead of time and refrigerate them until you’re ready to bake. Brush them with egg just before they go into the oven.
For Halloween, I love arranging these in a circle on a platter with a small bowl of marinara or cheese dip in the center. They make attractive Halloween finger foods and add a flaky, cheesy option to a table full of heavier appetizers.
If you’re putting together several Halloween party food ideas, these pumpkin-shaped bites are a great choice because they look festive without requiring a lot of extra decoration.
06. Halloween Taco Dip
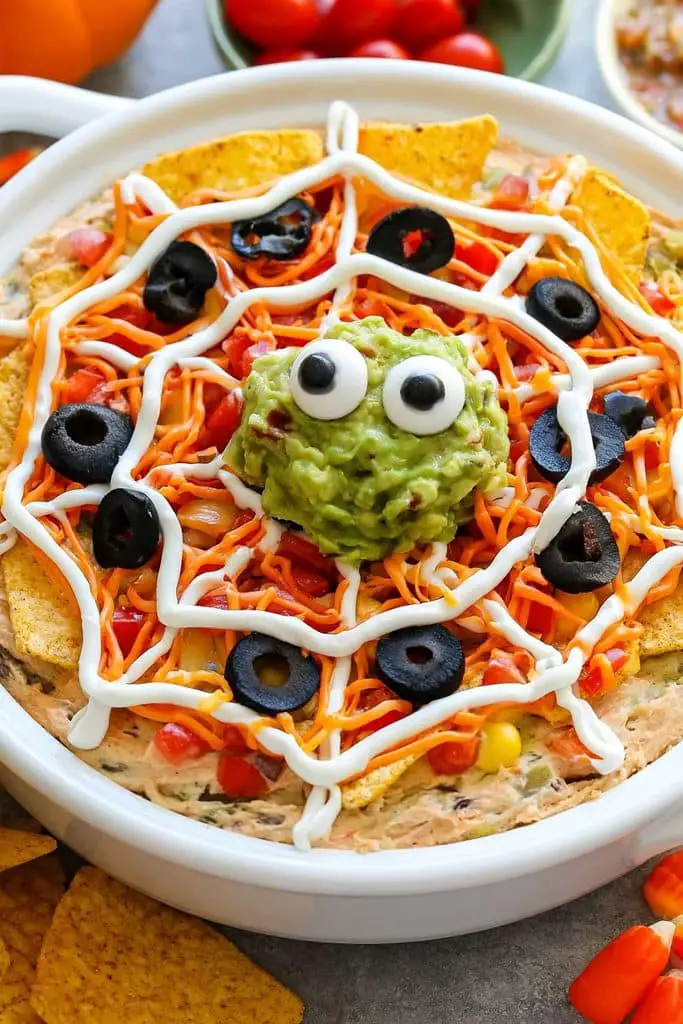
If you need an appetizer that can feed a crowd, Halloween Taco Dip is a great choice. It has all the creamy, cheesy, fresh flavors of a classic layered taco dip, but a simple spiderweb decoration turns it into one of the most fun Halloween appetizers on the table.
Prep time: 20 minutes
Cook time: None
Chill time: 30 minutes, optional
Total time: About 50 minutes
Difficulty: Easy
Servings: 10–12
The layers can be prepared ahead of time, and the Halloween design takes only a few extra minutes. You can make it mild for a mixed crowd or add jalapeños, hot sauce, or spicy taco seasoning if you’re making it for adults who enjoy a little heat.
Ingredients
For the Taco Dip
- 8 ounces cream cheese, softened
- 1 cup sour cream
- 1 packet taco seasoning, about 1 ounce
- 1 cup refried beans
- 1 cup salsa, preferably thick and chunky
- 1 cup guacamole
- 1½ cups shredded Cheddar cheese or Mexican cheese blend
- ½ cup diced tomatoes
- ¼ cup sliced black olives
- 2 green onions, thinly sliced
- 1 small jalapeño, finely sliced, optional
For the Spiderweb
- ½ cup sour cream
- 1 small black olive
- A few extra black olive slices, for decoration
For Serving
- Tortilla chips
- Corn chips
- Bell pepper strips
- Cucumber slices, optional
How to Make Halloween Taco Dip
- Make the creamy layer.
Add the softened cream cheese, sour cream, and taco seasoning to a bowl. Mix until smooth and well combined. - Start the first layer.
Spread the refried beans evenly over the bottom of a shallow serving dish or pie plate. A shallow dish works best because all the colorful layers will be visible. - Add the creamy mixture.
Spread the seasoned cream cheese mixture over the beans. Try to create an even layer without disturbing the beans underneath. - Add the salsa.
Spoon the salsa over the creamy layer and gently spread it out. - Add the guacamole.
Spread the guacamole over the salsa. Don’t worry if the layers aren’t perfectly straight, the final toppings will cover most imperfections. - Add the cheese.
Sprinkle the shredded Cheddar or Mexican cheese blend evenly over the top. - Add the toppings.
Scatter diced tomatoes, black olives, and green onions over the cheese. If you like spicy food, add sliced jalapeño at this stage. - Create the spiderweb.
Put the sour cream into a small piping bag or a zip-top bag with the corner snipped off. Pipe several thin circles over the top of the dip, starting with a small circle in the center and making each circle slightly larger. - Turn it into a web.
Use a toothpick to gently drag lines from the center toward the outside edge of the dip. Wipe the toothpick after each line. This pulls the sour cream circles into a simple spiderweb pattern. - Add the spider.
Cut a black olive in half and use one half as the spider’s body. Slice another olive into thin strips and arrange them around the body to make the legs. - Chill if desired.
Cover the dip and refrigerate for about 30 minutes before serving. This also gives the flavors a little time to come together. - Serve.
Place the taco dip in the center of a large platter and surround it with tortilla chips. Serve immediately.
Easy Variations
Spicy Halloween Taco Dip:
Add diced jalapeños, hot salsa, and a little cayenne pepper to the creamy layer.
Meaty Taco Dip:
Brown some ground beef with taco seasoning, let it cool slightly, and add it as a separate layer between the refried beans and creamy mixture.
Chicken Taco Dip:
Use shredded cooked chicken seasoned with taco seasoning for a heartier version.
Vegetarian Taco Dip:
The basic recipe is already vegetarian. You can add extra black beans, corn, bell peppers, or diced avocado.
My Tip
Use a shallow, wide dish rather than a deep bowl. The Halloween spiderweb will be much easier to see, and your guests won’t have to dig through several layers to get to the good stuff.
If you’re preparing this for a party, you can make almost the entire dip several hours ahead. I would wait until shortly before serving to add the spiderweb and tortilla chips. That way, the design stays neat and the chips remain crisp.
For an adults-only gathering, I especially like making this dip a little spicy and serving it with plenty of crunchy tortilla chips. It makes a great contrast to warm appetizers like mummy poppers and Mummy Pigs in a Blanket.
This is also one of those Halloween appetizers ideas that proves you don’t have to make every dish look frightening. A simple spiderweb, a few black olives, and some colorful taco layers are enough to turn a familiar party dip into fun Halloween party food.
07. Baked Brie Mummy
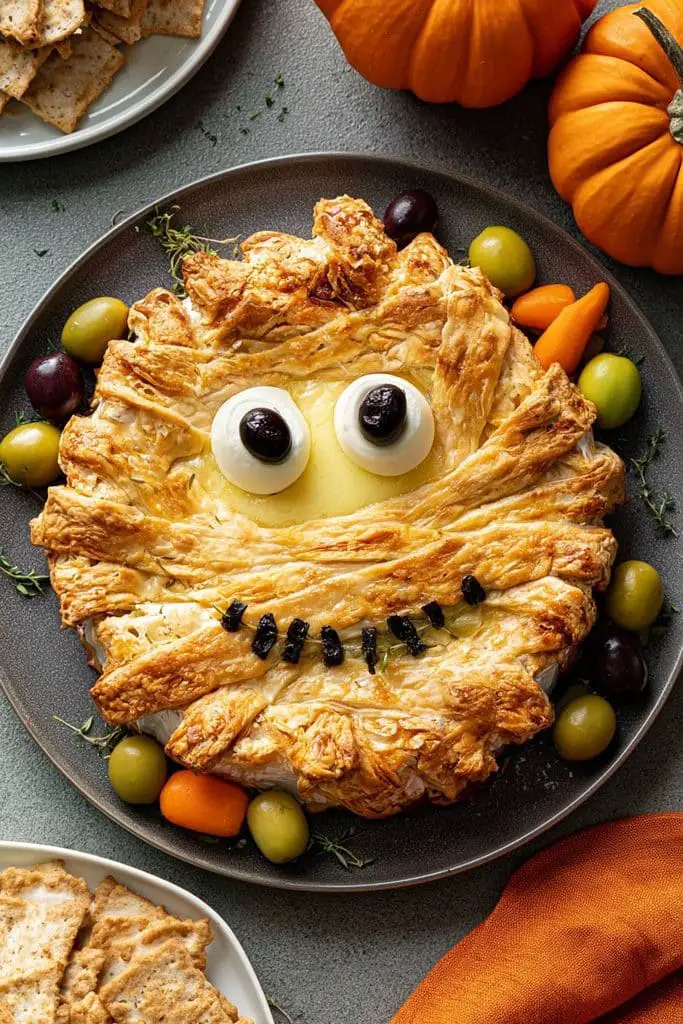
If you want one of your Halloween appetizers to look a little more elegant, this Baked Brie Mummy is a great choice. A wheel of creamy Brie is wrapped in puff pastry strips to look like a mummy, then baked until the pastry is golden and the cheese inside is warm and soft. Add two little olive eyes, and you have a spooky appetizer that looks impressive but is surprisingly easy to make.
Prep time: 15 minutes
Cook time: 20–25 minutes
Total time: About 40 minutes
Difficulty: Easy
Servings: 8–10
I like cranberry or fig preserves, but you can also use apricot, raspberry, or even a little hot pepper jelly if you’re making this for adults who enjoy sweet and spicy flavors. The important thing is not to overfill the Brie, because too much filling can leak out while baking.
Ingredients
- 1 round Brie cheese wheel, about 8 ounces
- 1 sheet puff pastry, thawed
- ⅓ cup cranberry, fig, or apricot preserves
- 1 large egg
- 1 tablespoon water
- 2 black olives, for the eyes
- Crackers, toasted baguette slices, or apple slices, for serving
- Fresh rosemary or thyme, optional, for garnish
How to Make Baked Brie Mummy
- Preheat the oven.
Preheat your oven to 400°F (200°C). Line a baking sheet with parchment paper. - Prepare the puff pastry.
Place the thawed puff pastry on a lightly floured surface. Smooth out any creases with your hands or a rolling pin. - Cut the pastry.
Cut the pastry into two parts. Keep one larger piece for wrapping the Brie and cut the other into thin strips. These strips will become the mummy’s bandages. - Add the Brie.
Place the Brie in the center of the larger piece of puff pastry. - Add the preserves.
Spoon the preserves over the top of the Brie, keeping them mostly in the center. Leave a little space around the edges so the filling doesn’t spill out when you wrap it. - Wrap the Brie.
Fold the pastry up and over the Brie, pressing the edges together to seal it. If there is excess pastry underneath, gently tuck it under the Brie. - Add the mummy bandages.
Lay the thin strips of puff pastry across the wrapped Brie in different directions. Leave a small open area near the top for the eyes. Don’t make the strips perfectly straight—slightly uneven bandages give the mummy more character. - Brush with egg wash.
Beat the egg with one tablespoon of water. Lightly brush the exposed puff pastry with the egg wash. This helps it turn golden and glossy as it bakes. - Bake.
Place the wrapped Brie on the prepared baking sheet and bake for 20–25 minutes, or until the puff pastry is puffed and golden brown. - Let it rest.
Remove the Brie from the oven and let it rest for about 5–10 minutes. This gives the melted cheese a chance to settle slightly. - Add the eyes.
Cut two small pieces from the black olives. Place them on the exposed section of Brie or secure them with tiny dots of cream cheese to create the mummy’s eyes. - Serve warm.
Transfer the mummy Brie to a serving board and surround it with crackers, toasted baguette slices, apple slices, or pear slices.
Easy Variations
Cranberry Brie Mummy:
Use cranberry preserves for a sweet-tart filling that works especially well for fall parties.
Fig and Walnut Mummy:
Add a thin layer of fig preserves and a few finely chopped walnuts before wrapping the Brie.
Spicy Pepper Jelly Mummy:
Use red pepper jelly for a sweet and spicy version that’s particularly good for an adults-only party.
Garlic Herb Brie:
Skip the preserves and add minced garlic and fresh herbs for a savory version.
My Tip
Don’t put the mummy eyes on before baking. Black olives can dry out or shift in the oven, so it’s much easier to add them after the Brie comes out.
Also, don’t wrap the pastry bandages too tightly. Leave some of the golden Brie visible underneath. That gives the appetizer a more recognizable mummy appearance and makes the presentation much more interesting.
For a Halloween party, I like placing this in the middle of a serving board and surrounding it with crackers, sliced apples, grapes, and nuts. When guests cut into the warm Brie, the creamy cheese and fruit filling make this more than just decorative creepy food for Halloween.
If you’re planning several Halloween appetizers for party adults, this is also a nice way to add something slightly more sophisticated to the menu. It’s warm, creamy, sweet, savory, and easy enough that you don’t need to be an experienced baker to make it look party-ready.
08. Eyeball Caprese Skewers
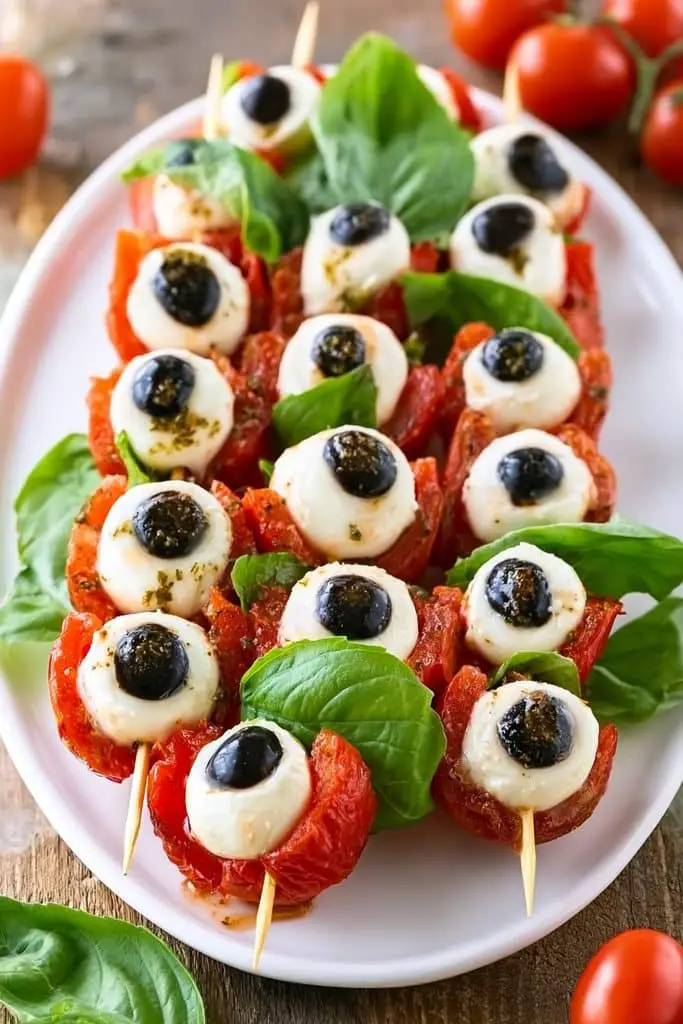
These Eyeball Caprese Skewers are a fun option when you want something fresh and light among all the cheesy and pastry-based Halloween appetizers. They take the familiar combination of mozzarella, tomatoes, and basil and give it a creepy Halloween makeover. The mozzarella becomes the eyeball, while olives create the pupil.
Prep time: 20 minutes
Cook time: None
Total time: About 20 minutes
Difficulty: Very easy
Yield: 20–24 skewers
I especially like this recipe for adults because it doesn’t feel overly sweet or childish. You can also add prosciutto for a more filling version or use pesto instead of basil for extra flavor.
Ingredients
- 20–24 small fresh mozzarella balls (bocconcini or ciliegine)
- 20–24 cherry tomatoes
- 20–24 fresh basil leaves
- 10–12 black olives, pitted
- 2 tablespoons extra-virgin olive oil
- 2 tablespoons balsamic glaze
- ¼ teaspoon salt
- ¼ teaspoon freshly ground black pepper
- 20–24 small appetizer skewers or toothpicks
How to Make Eyeball Caprese Skewers
- Prepare the mozzarella.
Drain the mozzarella balls and gently pat them dry with paper towels. Removing excess moisture helps the olive pieces stick better and prevents the skewers from becoming watery. - Prepare the tomatoes and basil.
Wash the cherry tomatoes and dry them thoroughly. If the basil leaves are large, you can fold them in half. - Make the eyeballs.
Take one black olive and cut it into thin slices. Use the round pieces to create the pupils of the eyeballs. If necessary, cut a small olive piece to fit neatly in the center of each mozzarella ball. - Add the pupils.
Gently press a small piece of black olive onto each mozzarella ball. If it doesn’t stick easily, you can use a tiny dab of cream cheese or soft cheese to hold it in place. - Assemble the skewers.
Thread a cherry tomato, basil leaf, and mozzarella eyeball onto each skewer. You can change the order depending on how you want them to look. - Arrange on a platter.
Place the finished skewers on a large serving platter with the mozzarella eyeballs facing upward. This makes the Halloween design much easier to see. - Season.
Drizzle the skewers lightly with olive oil and balsamic glaze. Finish with salt and freshly ground black pepper. - Serve.
Serve immediately or refrigerate until you’re ready to put them out for your guests.
Easy Variations
Prosciutto Caprese Skewers:
Add a small folded piece of prosciutto to each skewer for a salty, savory addition.
Pesto Caprese Skewers:
Replace the fresh basil with a small drizzle of pesto. The green color also makes the skewers look extra spooky.
Spicy Caprese Skewers:
Add a small slice of fresh chili or drizzle with chili-infused olive oil.
Balsamic Caprese Skewers:
For a stronger sweet-tangy flavor, add a little extra balsamic glaze just before serving.
My Tip
The trick to making these look like actual eyeball appetizers is to use small, round mozzarella balls. If the mozzarella is too large or irregular, the eyeball effect won’t be as convincing.
I also recommend adding the balsamic glaze just before serving. If you add too much too early, it can run over the mozzarella and cover the little olive pupils.
These are one of my favorite Halloween finger foods because guests can simply pick one up and eat it without needing a plate or fork. They also add some freshness to a Halloween spread that might otherwise be full of pastry, cheese, and meat.
If you’re collecting Halloween appetizers ideas for an adult party, these are worth adding to the menu. They look like creepy food for Halloween, but underneath the spooky presentation, they’re simply delicious little Caprese bites.
09. Halloween Guacamole
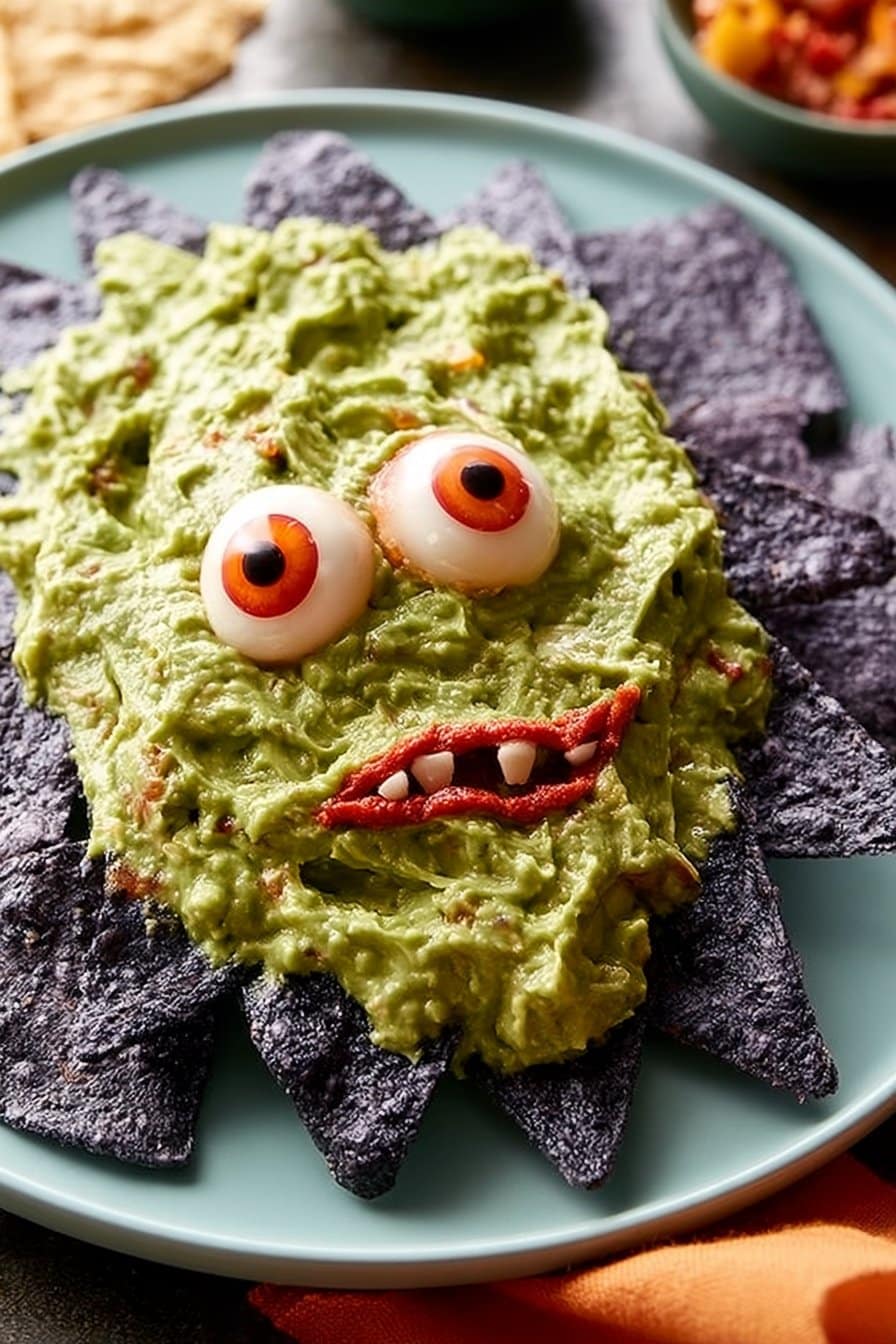
Halloween Guacamole is one of those Halloween appetizers that takes almost no effort but can make a big impact on the party table. The guacamole itself is fresh, creamy, and full of familiar Mexican flavors, while a simple spiderweb design made with sour cream gives it a spooky Halloween twist.
Prep time: 15 minutes
Cook time: None
Total time: About 15 minutes
Difficulty: Very easy
Servings: 6–8
This is a great choice when you already have several hot appetizers on the menu and want something fresh to balance them out. You can keep the guacamole mild with just lime and cilantro, or make it more suitable for an adults-only party by adding jalapeño, chili, or a little hot sauce.
Ingredients
For the Guacamole
- 3 large ripe avocados
- 1 small tomato, finely diced
- ¼ cup finely chopped red onion
- 1 small jalapeño, finely chopped, optional
- 2 tablespoons fresh cilantro, chopped
- 1–2 tablespoons fresh lime juice
- ½ teaspoon salt, or to taste
- ¼ teaspoon black pepper
- 1 small garlic clove, finely minced, optional
For the Halloween Decoration
- ¼ cup sour cream
- 1 black olive
- A few extra black olive slices, optional
For Serving
- Tortilla chips
- Black tortilla chips, if available
- Sliced bell peppers
- Cucumber sticks, optional
How to Make Halloween Guacamole
- Prepare the avocados.
Cut the avocados in half and remove the pits. Scoop the flesh into a medium bowl. - Mash the avocados.
Use a fork to mash the avocado until mostly smooth. I like leaving a few small chunks because they give the guacamole a better texture. - Add the fresh ingredients.
Add the diced tomato, red onion, cilantro, and jalapeño if using. - Season the guacamole.
Add the lime juice, salt, black pepper, and minced garlic. Gently mix everything together. - Taste and adjust.
Taste the guacamole and add more lime juice, salt, or jalapeño if needed. If you’re making this for adults who enjoy spicy food, a few drops of hot sauce work really well. - Transfer to a serving dish.
Spoon the guacamole into a wide, shallow serving bowl or platter. Smooth the surface with the back of a spoon. - Make the spiderweb.
Add the sour cream to a small piping bag or zip-top bag. Snip off a very small corner. - Pipe the web.
Starting in the center, pipe several thin circles on top of the guacamole. Make each circle slightly larger than the previous one. - Create the web pattern.
Using a toothpick, gently drag lines from the center circle toward the outside edge. Repeat around the dip until you have a simple spiderweb design. - Add the spider.
Cut a black olive in half and use one half for the spider’s body. Slice another olive into thin strips and arrange them around the body as legs. - Serve immediately.
Surround the guacamole with tortilla chips and serve.
Easy Variations
Spicy Halloween Guacamole:
Add extra jalapeño, serrano pepper, chili powder, or your favorite hot sauce.
Roasted Corn Guacamole:
Mix in a little roasted corn for sweetness and texture.
Bacon Guacamole:
For an adults-only twist, add crispy crumbled bacon just before serving.
Pomegranate Guacamole:
Sprinkle a few pomegranate seeds over the top. The bright red color gives the platter an extra spooky look.
My Tip
The biggest problem with guacamole is that it can turn brown if it sits around for too long. To keep it looking fresh, make it as close to serving time as possible. You can also gently press plastic wrap directly against the surface of the guacamole while storing it in the refrigerator.
I recommend using a wide, shallow dish for this recipe. A deep bowl makes the spiderweb difficult to see, while a flat surface gives you plenty of room to create a clear Halloween design.
If you want to make the presentation even more fun, serve the guacamole with a mixture of regular and black tortilla chips. The contrast makes the green guacamole stand out beautifully.
This is also a great option when you’re looking for Halloween party food ideas that don’t involve turning every recipe into complicated creepy food for Halloween. The guacamole remains fresh and delicious, while the spiderweb and olive spider provide just enough Halloween character.
Among all the Halloween appetizers ideas on this list, this one is probably one of the easiest to prepare at the last minute, and it’s a welcome fresh option alongside all those warm, cheesy Halloween finger foods.
10. Stuffed Mushrooms

Stuffed Mushrooms may not look spooky on their own, but they are a great addition to a Halloween spread when you want something savory and a little more elegant. Tender mushroom caps are filled with a creamy mixture of cheese, garlic, herbs, and breadcrumbs, then baked until golden and bubbling.
Prep time: 20 minutes
Cook time: 20 minutes
Total time: About 40 minutes
Difficulty: Easy
Servings: 6–8
For an adults-only party, these are especially nice because they feel more like a restaurant-style appetizer than typical Halloween snacks. You can keep them simple with Parmesan and herbs, or add cooked bacon, sausage, spinach, or a little chili for extra flavor. They also work well alongside more obviously spooky appetizers, such as mummy poppers and spider deviled eggs.
Ingredients
- 16 ounces white or cremini mushrooms
- 4 ounces cream cheese, softened
- ½ cup finely grated Parmesan cheese
- ¼ cup breadcrumbs
- 2 cloves garlic, finely minced
- 2 tablespoons fresh parsley, finely chopped
- 1 tablespoon olive oil
- ½ teaspoon dried Italian seasoning
- ¼ teaspoon salt
- ¼ teaspoon black pepper
- ¼ teaspoon red pepper flakes, optional
- 2 tablespoons shredded mozzarella cheese, optional
How to Make Stuffed Mushrooms
- Preheat the oven.
Preheat your oven to 375°F (190°C). Lightly grease a baking dish or line a baking sheet with parchment paper. - Clean the mushrooms.
Gently wipe the mushrooms with a damp paper towel to remove any dirt. Avoid soaking them in water because mushrooms can absorb moisture and become watery during baking. - Remove the stems.
Carefully twist or pull the stems out of each mushroom cap. Chop the stems finely and set them aside. - Cook the mushroom stems.
Heat the olive oil in a skillet over medium heat. Add the chopped mushroom stems and garlic. Cook for about 3–4 minutes, stirring occasionally, until the mushrooms soften and most of their moisture has cooked away. - Make the filling.
Transfer the cooked mushroom mixture to a bowl. Add the softened cream cheese, Parmesan, breadcrumbs, parsley, Italian seasoning, salt, black pepper, and red pepper flakes if using. Mix until everything is well combined. - Fill the mushroom caps.
Place the mushroom caps with the hollow side facing up. Spoon the filling into each cap, pressing it gently into the mushroom so it stays in place. - Add the cheese.
If using mozzarella, sprinkle a small amount over each stuffed mushroom. This gives the tops a nicely melted and golden finish. - Bake.
Arrange the mushrooms in your prepared baking dish and bake for 18–20 minutes, or until the mushrooms are tender and the tops are golden brown. - Let them cool slightly.
Allow the mushrooms to rest for about 5 minutes before serving. The filling will be very hot straight from the oven. - Garnish and serve.
Sprinkle with a little fresh parsley and transfer to a serving platter.
Easy Variations
Bacon Stuffed Mushrooms:
Add ¼ cup of finely chopped, cooked bacon to the filling. The smoky bacon works beautifully with the creamy cheese.
Sausage Stuffed Mushrooms:
Brown a little Italian sausage, crumble it finely, and mix it into the filling for a heartier appetizer.
Spinach and Cheese:
Add finely chopped cooked spinach for a vegetarian variation with extra color and flavor.
Spicy Stuffed Mushrooms:
Increase the red pepper flakes or add finely chopped jalapeño for a little heat.
Cheesy Garlic Mushrooms:
Skip the herbs and use extra garlic, Parmesan, and mozzarella for a rich, cheesy filling.
My Tip
The key to good stuffed mushrooms is keeping the filling fairly dry. If your mushroom-stem mixture contains too much moisture, the filling can become soggy. Cook the chopped stems until most of their liquid has evaporated before mixing them with the cheese.
I also recommend choosing mushrooms that are roughly the same size. They will cook more evenly and will look much better arranged together on a serving platter.
These aren’t the most obviously spooky Halloween appetizers, but that’s actually why I like including them. If your Halloween menu is filled with mummies, spiders, eyeballs, and other creepy food for Halloween, a platter of golden stuffed mushrooms gives your guests something a little more classic and sophisticated.
For an adults-only gathering, serve them warm alongside a glass of your favorite drink and some lighter Halloween finger foods. They’re easy enough for a casual party but special enough for a more polished Halloween dinner or cocktail gathering.
11. Pumpkin-Shaped Mini Pizzas
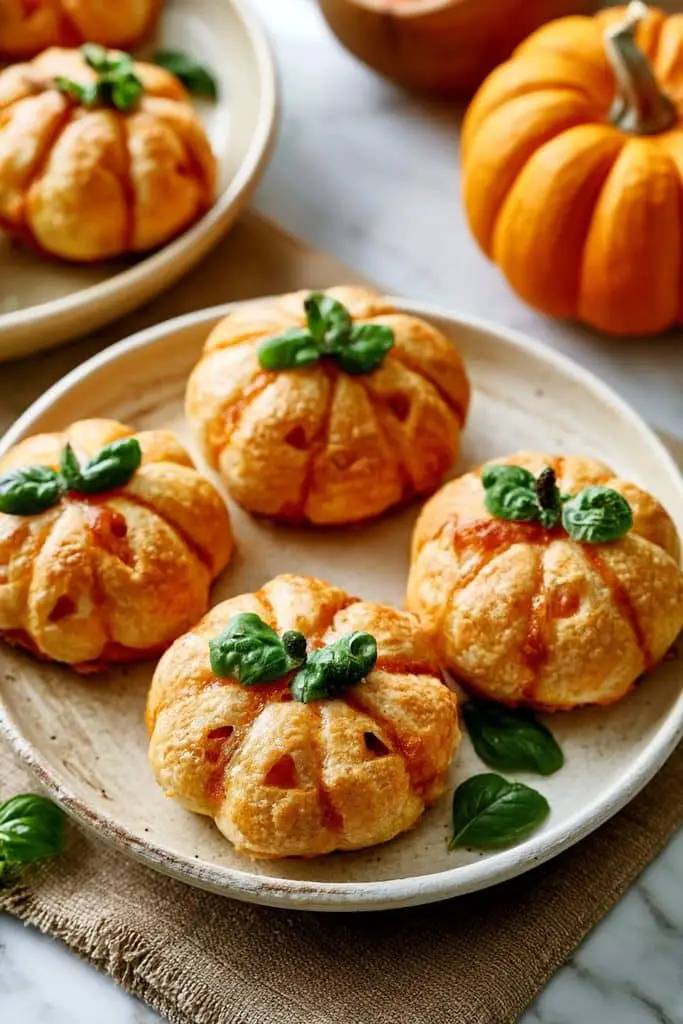
These Pumpkin-Shaped Mini Pizzas are one of my favorite ways to make ordinary pizza feel festive for Halloween. Small pieces of pizza dough are shaped like pumpkins, topped with pizza sauce and melted cheese, and baked until golden and bubbly. They’re easy to customize and make a fun addition to a table full of spooky appetizers.
Prep time: 20 minutes
Cook time: 12–15 minutes
Total time: About 35 minutes
Difficulty: Easy
Servings: 8–10 mini pizzas
You can keep them simple with mozzarella and pepperoni, or add vegetables, cooked chicken, or sausage depending on what your guests enjoy. For a Halloween party, I like using a little extra cheese and arranging the toppings so the pumpkin shapes remain clearly visible.
Ingredients
- 1 pound pizza dough, homemade or store-bought
- ½ cup pizza sauce
- 1½ cups shredded mozzarella cheese
- ½ cup mini pepperoni or chopped pepperoni
- 1 tablespoon olive oil
- ½ teaspoon Italian seasoning
- ¼ teaspoon garlic powder
- ¼ teaspoon black pepper
For the Pumpkin Shape
- 1 pumpkin-shaped cookie cutter, approximately 3–4 inches
- Small pieces of green bell pepper or fresh basil for the pumpkin stems
How to Make Pumpkin-Shaped Mini Pizzas
- Preheat the oven.
Preheat your oven to 425°F (220°C). Line a large baking sheet with parchment paper. - Prepare the dough.
Lightly flour your work surface and roll the pizza dough to about ¼-inch thickness. - Cut the pumpkin shapes.
Use a pumpkin-shaped cookie cutter to cut the dough into individual pumpkin shapes. Gather the leftover dough, roll it again, and continue cutting until you have used most of it. - Create the pumpkin details.
Use the edge of a knife to gently make a few shallow curved lines on each dough pumpkin. Don’t cut all the way through. These lines will make the pumpkins more recognizable after baking. - Add the sauce.
Place the dough shapes on the prepared baking sheet. Spread a thin layer of pizza sauce over each one, leaving a small border around the edges. - Add the cheese.
Sprinkle mozzarella evenly over the sauce. Try not to cover the outer edges too heavily so the pumpkin shape remains visible. - Add your toppings.
Place mini pepperoni pieces over the cheese. You can also use cooked sausage, chicken, mushrooms, olives, or bell peppers. - Season the pizzas.
Sprinkle lightly with Italian seasoning, garlic powder, and black pepper. Drizzle or brush the exposed dough edges with a little olive oil. - Bake.
Bake for 12–15 minutes, or until the crust is golden and the cheese is melted and bubbling. - Add the stems.
Once the pizzas are out of the oven, add a small piece of green bell pepper or fresh basil at the top of each pumpkin to resemble a stem. - Serve warm.
Let the mini pizzas cool for a couple of minutes before transferring them to a serving platter.
Easy Variations
Pepperoni Pumpkin Pizzas:
Keep things classic with pizza sauce, mozzarella, and mini pepperoni.
Vegetable Pumpkin Pizzas:
Use finely chopped bell peppers, mushrooms, olives, and sweet corn for a colorful vegetarian option.
Chicken Alfredo Pumpkins:
Replace the pizza sauce with Alfredo sauce and top with cooked chicken, mozzarella, and Parmesan.
Spicy Pumpkin Pizzas:
Add sliced jalapeños, chili flakes, and Pepper Jack cheese for adults who like a little heat.
Halloween Face Pizzas:
Use black olives, pepperoni, and small pieces of bell pepper to create simple spooky faces on the pumpkins.
My Tip
Don’t make the dough too thin. A little thickness helps the mini pizzas hold their pumpkin shape and gives you a soft, chewy center with lightly crisp edges.
I also recommend keeping the toppings fairly light. Too many toppings can make the dough difficult to handle and can hide the pumpkin shape once the cheese melts.
For a Halloween party, you can prepare the pumpkin shapes and toppings a few hours ahead, then assemble and bake them shortly before your guests arrive. This makes them a practical choice when you’re putting together several Halloween appetizers at the same time.
These little pizzas are also perfect Halloween finger foods because guests can simply pick one up and eat it without needing a plate or fork. Arrange them on a large dark serving platter with a bowl of marinara or garlic dip in the center, and you’ve got an easy Halloween food idea that looks much more special than ordinary mini pizzas.
12. Halloween Meatballs
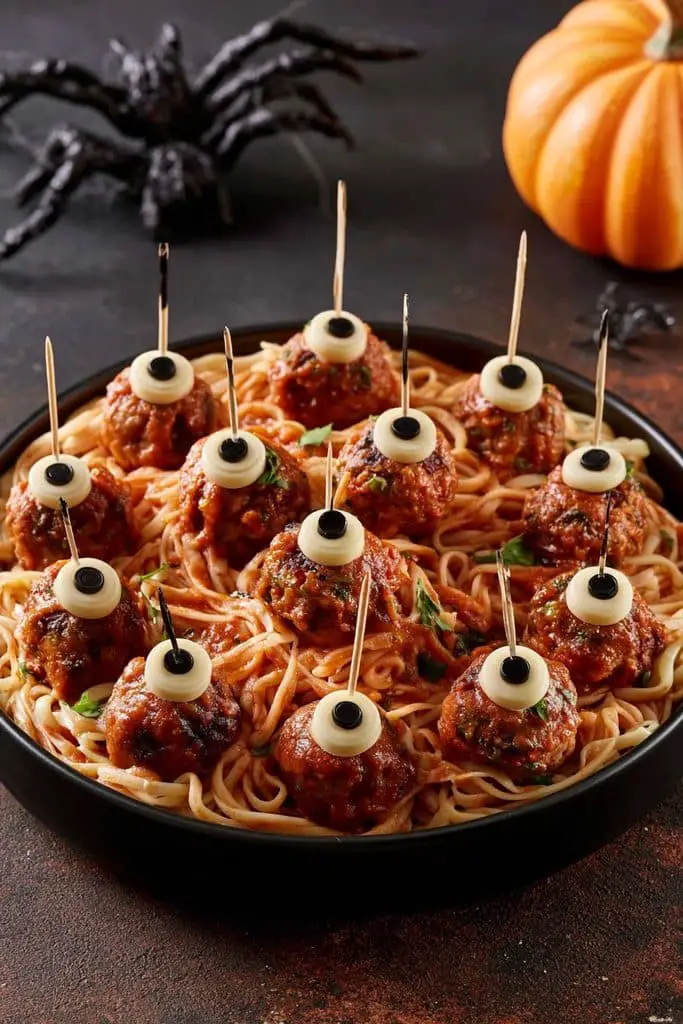
These Halloween Meatballs are a fun way to turn a familiar party favorite into something a little creepy. Juicy meatballs are coated in marinara sauce and decorated with mozzarella and olives to look like spooky little eyeballs.
Prep time: 20 minutes
Cook time: 25 minutes
Total time: 45 minutes
Difficulty: Easy
Servings: 6–8
You can make these with homemade meatballs or save time by using good-quality frozen meatballs. For a Halloween party, I like making the eyeball decoration because it takes only a few extra minutes but makes the dish instantly recognizable.
Ingredients
For the Meatballs
- 1 pound ground beef
- ½ cup breadcrumbs
- 1 egg
- ¼ cup grated Parmesan cheese
- 2 cloves garlic, minced
- 2 tablespoons chopped fresh parsley
- ½ teaspoon Italian seasoning
- ½ teaspoon salt
- ¼ teaspoon black pepper
- 1 tablespoon olive oil
For the Sauce and Decoration
- 2 cups marinara sauce
- 4 ounces mozzarella cheese
- 10–12 black olives, sliced into rounds
- 1 tablespoon chopped fresh parsley, optional
How to Make Halloween Meatballs
- Prepare the meatball mixture.
In a large bowl, combine the ground beef, breadcrumbs, egg, Parmesan, garlic, parsley, Italian seasoning, salt, and black pepper. Mix gently until everything is just combined. - Shape the meatballs.
Divide the mixture into small portions and roll them into balls. Aim for roughly 1½-inch meatballs so they are easy to serve as party food. - Cook the meatballs.
Heat olive oil in a large skillet over medium heat. Add the meatballs and cook, turning occasionally, until browned on all sides and cooked through, about 10–12 minutes. - Add the marinara.
Pour the marinara sauce over the cooked meatballs. Reduce the heat and simmer for about 8–10 minutes so the meatballs absorb some of the sauce. - Prepare the eyeballs.
Cut the mozzarella into small circles or use small mozzarella pearls. Place one piece of mozzarella on top of each meatball. - Add the pupils.
Place a small round slice of black olive in the center of each mozzarella piece. This creates the simple eyeball effect. - Warm briefly.
Cover the pan for 1–2 minutes, just until the mozzarella softens slightly and sticks to the meatballs. Don’t let it melt completely. - Garnish and serve.
Sprinkle with fresh parsley if desired. Serve the meatballs warm with extra marinara sauce on the side.
Easy Variations
Spicy Halloween Meatballs:
Add crushed red pepper flakes to the meat mixture and use a spicy marinara sauce.
Chicken Meatballs:
Replace the beef with ground chicken or turkey for a lighter version.
Cheesy Meatballs:
Stuff a small cube of mozzarella into the center of each meatball before cooking.
BBQ Halloween Meatballs:
Use your favorite barbecue sauce instead of marinara and decorate with cheese and olives.
Spider Meatballs:
Skip the eyeball decoration and arrange thin strips of black olives around each meatball to resemble spider legs.
My Tip
Keep the meatballs fairly small. They’re easier to pick up, cook more evenly, and look much better on a Halloween appetizer platter.
For the eyeballs, don’t worry about making every mozzarella circle perfectly round. Small mozzarella pearls are an easy shortcut, and a tiny olive slice in the middle does most of the work.
If you’re serving these at a party, keep them warm in a slow cooker or covered serving dish with plenty of sauce. That way, guests can grab one or two whenever they want without the meatballs drying out.
These are also great Halloween finger foods because they’re substantial enough to satisfy hungry guests while still being easy to serve. Add some toothpicks and a bowl of extra marinara, and you have a simple Halloween party food idea that looks spooky without requiring complicated decorating.
13. Monster Cheese Dip
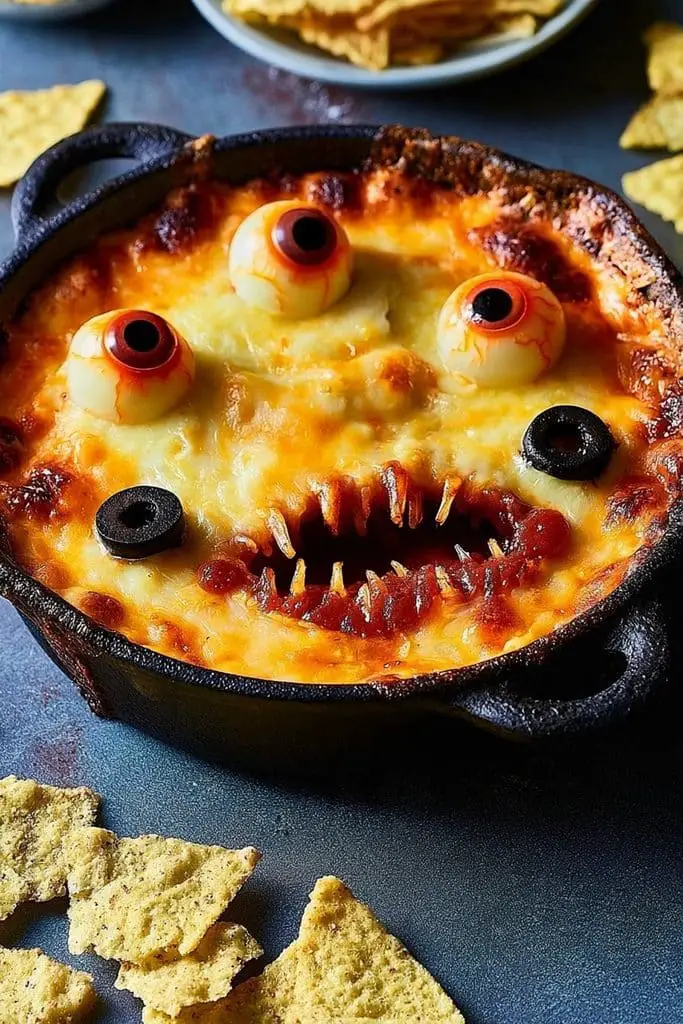
This Monster Cheese Dip is a creamy, cheesy appetizer that looks much more complicated than it actually is. I make a simple warm cheese dip, then turn it into a little Halloween monster with sliced olives, peppers, and other easy toppings. It’s perfect for serving with tortilla chips, crackers, or crunchy vegetables.
Prep time: 15 minutes
Cook time: 15 minutes
Total time: 30 minutes
Difficulty: Easy
Servings: 8–10
The best part is that you can use your favorite cheese dip recipe as the base. For a Halloween party, I like keeping the dip creamy and mild, then letting the decorations provide all the spooky character.
Ingredients
For the Cheese Dip
- 8 ounces cream cheese, softened
- 1 cup shredded Cheddar cheese
- ½ cup shredded Monterey Jack cheese
- ½ cup sour cream
- ¼ cup milk
- 1 small jalapeño, finely chopped, optional
- ½ teaspoon garlic powder
- ½ teaspoon onion powder
- ¼ teaspoon black pepper
- 2 tablespoons chopped green onions
For the Monster Decoration
- 2 black olives, sliced
- 2 small mozzarella balls or cheese pieces, for the eyes
- 1 small piece of red bell pepper, for the mouth
- ½ cup shredded lettuce or green onions, optional
- Tortilla chips, crackers, or fresh vegetables, for serving
How to Make Monster Cheese Dip
- Prepare the cheese mixture.
Add the softened cream cheese, Cheddar, Monterey Jack, sour cream, milk, garlic powder, onion powder, and black pepper to a saucepan. - Heat gently.
Place the saucepan over low to medium-low heat. Stir frequently until the cheeses melt and the mixture becomes smooth and creamy. - Add the extras.
Stir in the chopped jalapeño and green onions. Continue heating for another 2–3 minutes. - Transfer to a serving bowl.
Spoon the warm cheese dip into a shallow, round serving bowl. Smooth the surface with the back of a spoon. - Make the monster eyes.
Place two small mozzarella pieces on top of the dip. Add a thin slice of black olive to the center of each one to create pupils. - Add the mouth.
Cut a small piece of red bell pepper into a curved or jagged shape and place it below the eyes to make a spooky monster mouth. - Add some messy details.
Sprinkle shredded lettuce or chopped green onions around the edges if you want the monster to look a little wild and messy. - Serve warm.
Arrange tortilla chips, crackers, or sliced vegetables around the bowl and serve immediately.
Easy Variations
Spicy Monster Dip:
Add extra jalapeño, hot sauce, or a pinch of crushed red pepper flakes.
Mexican-Style Monster Dip:
Add taco seasoning, chopped tomatoes, and green chilies to the cheese mixture.
Buffalo Monster Dip:
Stir in a little buffalo sauce and shredded cooked chicken for a heartier appetizer.
Green Monster Dip:
Mix in chopped spinach or a little pesto to give the dip a naturally green color.
Extra Cheesy Monster:
Add mozzarella or Pepper Jack along with the Cheddar for an even cheesier dip.
My Tip
Use a shallow bowl rather than a deep one. It gives you more surface area to create the monster face, and guests can easily scoop the dip without reaching too far into the bowl.
I also recommend preparing the eyes and mouth before heating the dip. Once the cheese is warm, you can decorate it quickly and get it onto the table while it’s still creamy.
For a Halloween party, place the monster bowl in the center of a large platter and surround it with tortilla chips, crackers, cucumber slices, carrots, and bell peppers. It makes a fun centerpiece while giving guests plenty of options for dipping.
This is one of those Halloween appetizers that doesn’t need complicated ingredients or special equipment. The simple monster decoration does most of the work, making it a great Halloween party food idea when you’re already preparing several other dishes.
14. Witch Finger Breadsticks

These Witch Finger Breadsticks are a fun Halloween appetizer that turns simple breadstick dough into creepy-looking fingers. Almonds are used as the fingernails, while a little tomato or marinara sauce on the ends gives them an extra spooky touch. They’re easy to make and look especially fun piled into a basket at a Halloween party.
Prep time: 20 minutes
Cook time: 15–18 minutes
Total time: About 40 minutes
Difficulty: Easy
Servings: 10–12 breadsticks
You can use homemade breadstick dough or refrigerated pizza dough to save time. I like serving these with warm marinara sauce because the combination of crispy breadsticks and tomato dipping sauce is always a hit.
Ingredients
- 1 pound pizza or breadstick dough
- 2 tablespoons olive oil or melted butter
- 1 teaspoon Italian seasoning
- ½ teaspoon garlic powder
- ½ teaspoon salt
- 12 whole blanched almonds
- 1 tablespoon grated Parmesan cheese
- 1 cup marinara sauce, for dipping
How to Make Witch Finger Breadsticks
- Preheat the oven.
Preheat your oven to 400°F (200°C). Line a baking sheet with parchment paper. - Prepare the dough.
Roll the dough into a rectangle about ¼-inch thick. Cut it into strips approximately 5–6 inches long. - Shape the fingers.
Roll each strip gently between your hands to make it slightly rounded. Don’t make them too thin because they will puff up while baking. - Create the finger joints.
Use a knife to make two or three shallow lines near one end of each breadstick. These little marks will resemble the wrinkles around a finger joint. - Add the fingernails.
Press one almond firmly onto the end of each breadstick. Place the pointed or narrow end of the almond toward the center of the breadstick to create a more natural fingernail shape. - Add the seasoning.
Brush the breadsticks lightly with olive oil or melted butter. Sprinkle with Italian seasoning, garlic powder, salt, and Parmesan. - Bake.
Bake for 15–18 minutes, or until the breadsticks are puffed and lightly golden around the edges. - Add the spooky touch.
Let them cool for a few minutes. If you want a bloody-looking effect, add a tiny amount of marinara sauce around the almond nail or at the end of the breadstick. - Serve.
Arrange the breadsticks on a platter with a bowl of warm marinara sauce in the center for dipping.
Easy Variations
Cheesy Witch Fingers:
Add shredded mozzarella or extra Parmesan before baking for a cheesy version.
Garlic Butter Fingers:
Brush the baked breadsticks with melted butter mixed with minced garlic and parsley.
Spicy Witch Fingers:
Add crushed red pepper flakes or cayenne pepper to the seasoning mixture.
Herb Breadsticks:
Use rosemary, oregano, and basil instead of Italian seasoning.
Bloody Fingers:
Serve them with plenty of marinara sauce and add a little sauce around the almond nails for an extra creepy presentation.
My Tip
Make the finger shapes slightly uneven. Perfectly identical breadsticks can look less realistic, while different lengths and shapes actually make the platter look creepier.
Also, press the almonds firmly into the dough before baking. If an almond comes loose, you can attach it afterward with a tiny dab of cream cheese or melted cheese.
I like making these just before serving because they’re at their best when warm and slightly crisp. Put the marinara in a small bowl or ramekin and arrange the breadsticks around it so guests can grab one easily.
These are a great addition to your Halloween finger foods because the shape fits the theme perfectly while the flavor is still familiar and comforting. If you’re putting together several Halloween appetizers, these can also be prepared with different seasonings so everyone has something they enjoy.
15. Pumpkin Hummus
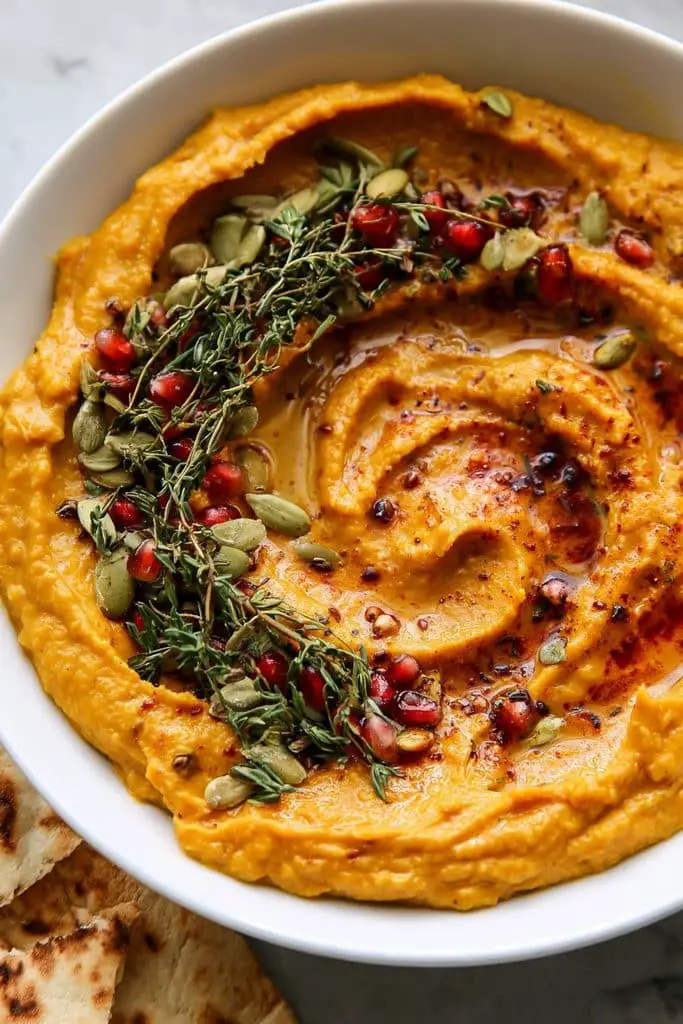
Pumpkin Hummus is an easy way to give a classic hummus dip a Halloween makeover. The hummus gets a warm orange color from pumpkin puree, while a few simple decorations make it look like a little pumpkin on the serving table. It’s creamy, savory, and perfect with pita bread, crackers, or fresh vegetables.
Prep time: 15 minutes
Cook time: None
Total time: 15 minutes
Difficulty: Very easy
Servings: 6–8
I like this recipe because most of the work can be done ahead of time. You can make the hummus, shape it on a platter, and keep it chilled until you’re ready to serve. For adults, a little smoked paprika, cumin, or chili flakes adds extra flavor without making the dip complicated.
Ingredients
- 1 can (15 ounces) chickpeas, drained and rinsed
- ½ cup pumpkin puree
- ¼ cup tahini
- 2 tablespoons lemon juice
- 1 small garlic clove
- 2 tablespoons olive oil
- ½ teaspoon ground cumin
- ½ teaspoon smoked paprika
- ½ teaspoon salt
- 2–3 tablespoons cold water, as needed
For Garnishing
- 1 tablespoon olive oil
- ½ teaspoon smoked paprika
- 1 small piece of cucumber, celery, or green bell pepper for the stem
- Fresh parsley, optional
- Pita bread, crackers, and fresh vegetables for serving
How to Make Pumpkin Hummus
- Prepare the chickpeas.
Drain and rinse the chickpeas well. Pat them dry with a paper towel if they are very wet. - Blend the ingredients.
Add the chickpeas, pumpkin puree, tahini, lemon juice, garlic, olive oil, cumin, smoked paprika, and salt to a food processor. - Blend until smooth.
Process for 1–2 minutes, scraping down the sides as needed. Add cold water, one tablespoon at a time, until the hummus reaches a smooth and creamy consistency. - Taste and adjust.
Taste the hummus and add a little more lemon juice, salt, cumin, or smoked paprika if needed. - Shape the pumpkin.
Spoon the hummus onto a serving platter and shape it into a round mound. Use the back of a spoon to make several curved lines from the center toward the edges, creating pumpkin-like sections. - Add the garnish.
Drizzle olive oil over the top and sprinkle lightly with smoked paprika. Place a small piece of cucumber, celery, or green bell pepper in the center to look like a pumpkin stem. - Serve.
Arrange pita wedges, crackers, cucumber, carrots, bell peppers, and other vegetables around the pumpkin hummus.
Easy Variations
Spicy Pumpkin Hummus:
Add cayenne pepper, chili flakes, or a little hot sauce for extra heat.
Roasted Garlic Pumpkin Hummus:
Use roasted garlic instead of fresh garlic for a deeper, slightly sweet flavor.
Herb Pumpkin Hummus:
Add fresh parsley or cilantro before blending.
Extra Smoky Hummus:
Increase the smoked paprika and add a small pinch of ground cumin.
Creamy Pumpkin Hummus:
Add an extra tablespoon of tahini for a richer texture.
My Tip
Don’t add too much pumpkin puree at once. Pumpkin contains more moisture than chickpeas, so adding the recommended amount first lets you control the final texture.
For the Halloween presentation, the curved lines are what really make this look like a pumpkin. I use the back of a spoon and gently drag it through the hummus rather than trying to make perfectly straight sections.
You can also prepare the hummus a day ahead and keep it covered in the refrigerator. Just give it a quick stir before shaping it on the serving platter.
This is one of my favorite lighter Halloween appetizers because guests can snack on it with vegetables and pita while enjoying the spooky presentation. It also adds a nice fresh option when your Halloween party food ideas include plenty of cheesy and baked dishes.
16. Spider Pizza Bites
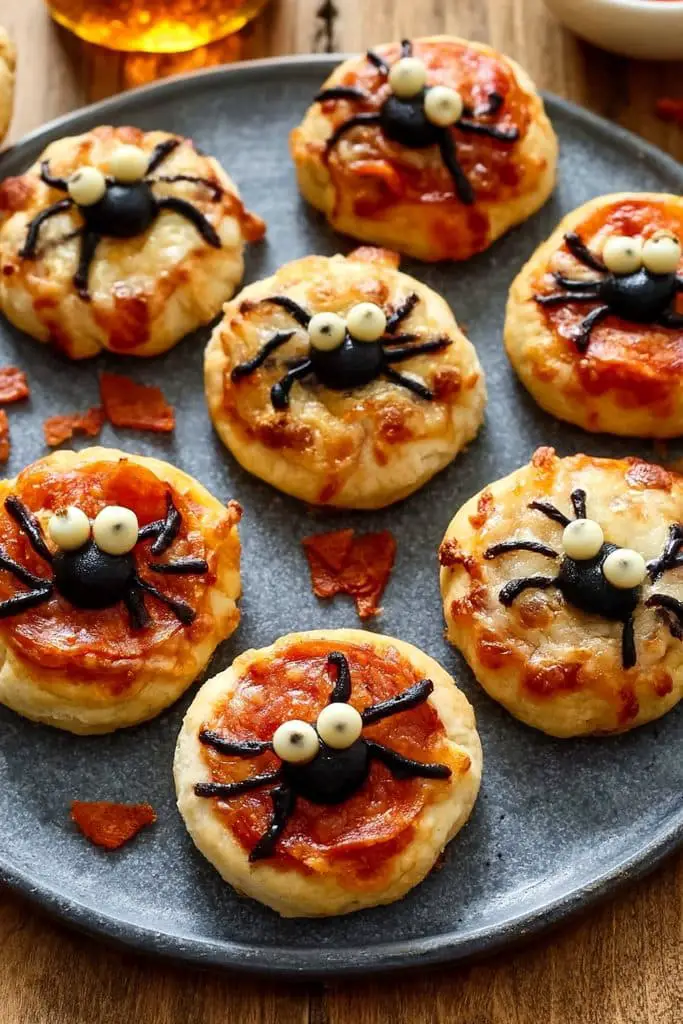
These Spider Pizza Bites are a simple Halloween twist on everyone’s favorite comfort food. Mini pizza bases are topped with sauce and melted cheese, then black olives are arranged on top to look like little spiders. They’re quick to make, easy to eat, and perfect when you need fun Halloween finger foods for a crowd.
Prep time: 15 minutes
Cook time: 10–12 minutes
Total time: About 25 minutes
Difficulty: Easy
Servings: 8–10
You can use mini bagels, English muffins, pita rounds, or small pieces of pizza dough as the base. I usually go with whatever I already have because the olive spider decoration is what really gives these their Halloween look.
Ingredients
- 8–10 mini bagels, English muffin halves, or small pizza bases
- ½ cup pizza sauce
- 1½ cups shredded mozzarella cheese
- ½ cup black olives
- ¼ cup mini pepperoni, optional
- ½ teaspoon Italian seasoning
- ¼ teaspoon garlic powder
- 1 tablespoon grated Parmesan, optional
- Fresh basil or parsley, optional
How to Make Spider Pizza Bites
- Preheat the oven.
Preheat your oven to 400°F (200°C). Line a baking sheet with parchment paper. - Prepare the pizza bases.
Place the mini bagel halves, English muffins, pita rounds, or pizza bases on the baking sheet. - Add the sauce.
Spread a thin layer of pizza sauce over each base, leaving a small border around the edges. - Add the cheese.
Sprinkle mozzarella evenly over the sauce. Add a few pieces of mini pepperoni if you’re using it. - Season.
Sprinkle lightly with Italian seasoning and garlic powder. - Bake the pizzas.
Bake for about 8–10 minutes, or until the cheese is melted and bubbling and the edges are lightly crisp. - Make the spiders.
While the pizzas are baking, slice the black olives. Use one larger olive piece for each spider’s body and cut thin olive strips for the legs. - Decorate.
Remove the pizza bites from the oven and immediately place the olive bodies on top. Arrange four thin olive strips on each side to create eight spider legs. - Finish and serve.
Sprinkle with a little Parmesan or fresh herbs if desired. Let them cool for a minute or two, then serve warm.
Easy Variations
Pepperoni Spider Pizzas:
Add mini pepperoni underneath the cheese for a classic pizza flavor.
Vegetable Spider Bites:
Top with finely chopped mushrooms, bell peppers, sweet corn, or spinach.
Spicy Spider Pizzas:
Add jalapeños, crushed red pepper flakes, and a little hot sauce.
White Pizza Spider Bites:
Skip the tomato sauce and use a thin layer of garlic cream sauce with mozzarella and Parmesan.
Chicken Pizza Bites:
Add small pieces of cooked chicken and a little extra cheese before baking.
My Tip
The easiest way to make the spiders is to use one whole or halved olive for the body and very thin strips for the legs. Don’t worry if the legs aren’t perfectly identical. A slightly messy spider actually looks more fun and creepy.
If you’re making a large batch, prepare all the olive spiders before the pizzas go into the oven. Then you can decorate them quickly while the cheese is still warm and soft.
I also recommend not adding the olive legs before baking. They can dry out and lose their shape. Adding them after the pizza comes out gives you a much cleaner Halloween design.
These are especially useful when you’re putting together several Halloween appetizers because the bases can be prepared ahead of time and baked in batches. Arrange the finished bites on a large platter, and you’ve got an easy Halloween party food idea that both kids and adults can enjoy.
17. Halloween Crostini
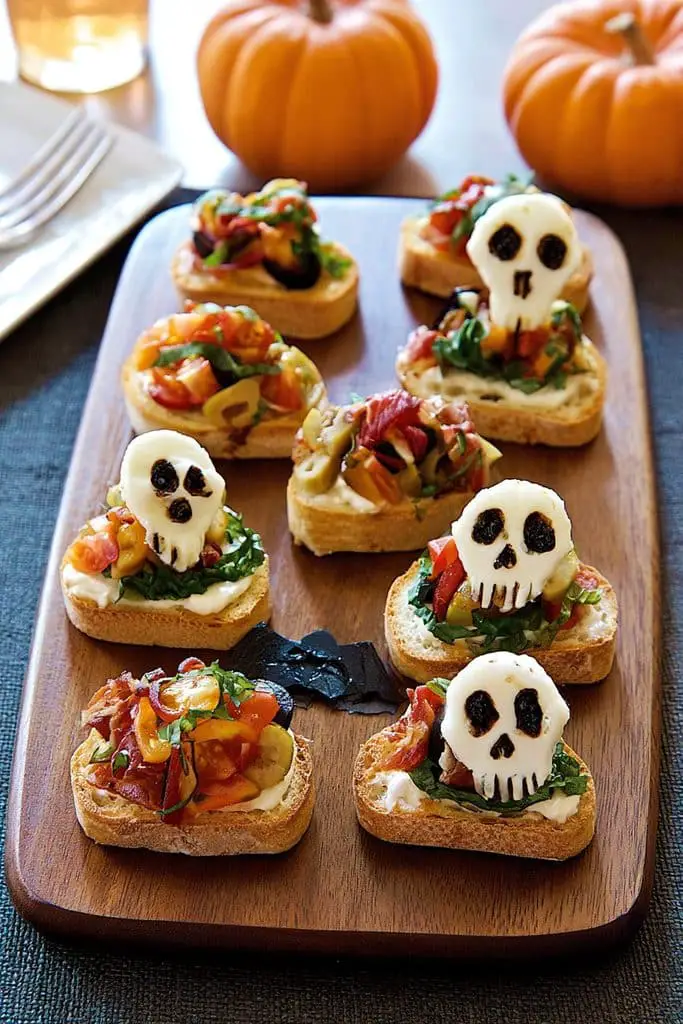
These Halloween Crostini are a simple way to turn crispy toasted bread into a party appetizer. I like topping them with creamy cheese, tomatoes, olives, or herbs and then adding small Halloween-inspired details on top. They look elegant enough for an adults’ party but are still easy enough to prepare without spending all day in the kitchen.
Prep time: 20 minutes
Cook time: 10–12 minutes
Total time: About 30 minutes
Difficulty: Easy
Servings: 8–10
The best thing about crostini is that you can make several flavors from the same toasted bread. For a Halloween party, I usually make a mixture of creamy, savory, and slightly tangy toppings so guests have a few different bites to choose from.
Ingredients
For the Crostini
- 1 French baguette
- 2 tablespoons olive oil
- 1 garlic clove, cut in half
- ¼ teaspoon salt
- ¼ teaspoon black pepper
For the Toppings
- 4 ounces cream cheese, softened
- ½ cup crumbled feta cheese
- ½ cup cherry tomatoes, finely chopped
- ¼ cup black olives, sliced
- 2 tablespoons fresh basil or parsley, chopped
- 1 tablespoon balsamic glaze, optional
How to Make Halloween Crostini
- Preheat the oven.
Preheat your oven to 400°F (200°C) and line a baking sheet with parchment paper. - Slice the baguette.
Cut the baguette into thin slices, about ½-inch thick. Arrange the slices in a single layer on the baking sheet. - Season the bread.
Brush each slice lightly with olive oil. Sprinkle with salt and pepper. - Toast the crostini.
Bake for 8–10 minutes, turning once if needed, until the bread is crisp around the edges and lightly golden. - Add garlic flavor.
While the bread is still warm, gently rub the cut side of the garlic clove over each slice. - Prepare the toppings.
In separate small bowls, prepare the cream cheese, feta, tomatoes, olives, and herbs so you can create different combinations. - Top the crostini.
Spread cream cheese or feta over the toasted bread. Add chopped tomatoes, olives, and herbs according to your preferred combination. - Create spooky designs.
Use thin olive slices to make simple spiders, spider webs, or other Halloween shapes. You can also arrange tomato pieces into small pumpkin-like faces. - Finish and serve.
Drizzle a little balsamic glaze over some of the crostini if desired. Arrange them on a platter and serve.
Easy Variations
Bruschetta Crostini:
Top the toasted bread with chopped tomatoes, basil, garlic, olive oil, and a little balsamic glaze.
Goat Cheese Crostini:
Replace the cream cheese with soft goat cheese and add honey, walnuts, and a few fresh herbs.
Olive Spider Crostini:
Spread cream cheese over each slice and use black olive pieces to create little spiders.
Pumpkin Crostini:
Use pumpkin-shaped pieces of roasted bell pepper or a small spoonful of pumpkin spread as the topping.
Prosciutto and Cheese Crostini:
Add a small piece of prosciutto with Brie or cream cheese for a more sophisticated adult appetizer.
My Tip
Toast the bread until it is crisp enough to hold the toppings but not so hard that it’s difficult to bite. I find that slightly thicker slices work better than very thin ones.
If you’re preparing these for a party, toast the crostini earlier in the day and keep them in an airtight container once completely cool. Add the toppings closer to serving time so the bread stays crunchy.
For the Halloween decorations, don’t overthink it. A few black olive slices arranged like tiny spiders can completely change the look of an otherwise ordinary crostini.
These make a great addition to your Halloween appetizers because they offer something a little lighter alongside cheesy dips, meatballs, and other warm dishes. They’re also easy Halloween finger foods, so guests can pick one up and enjoy it while mingling.
18. Deviled Egg Eyeballs
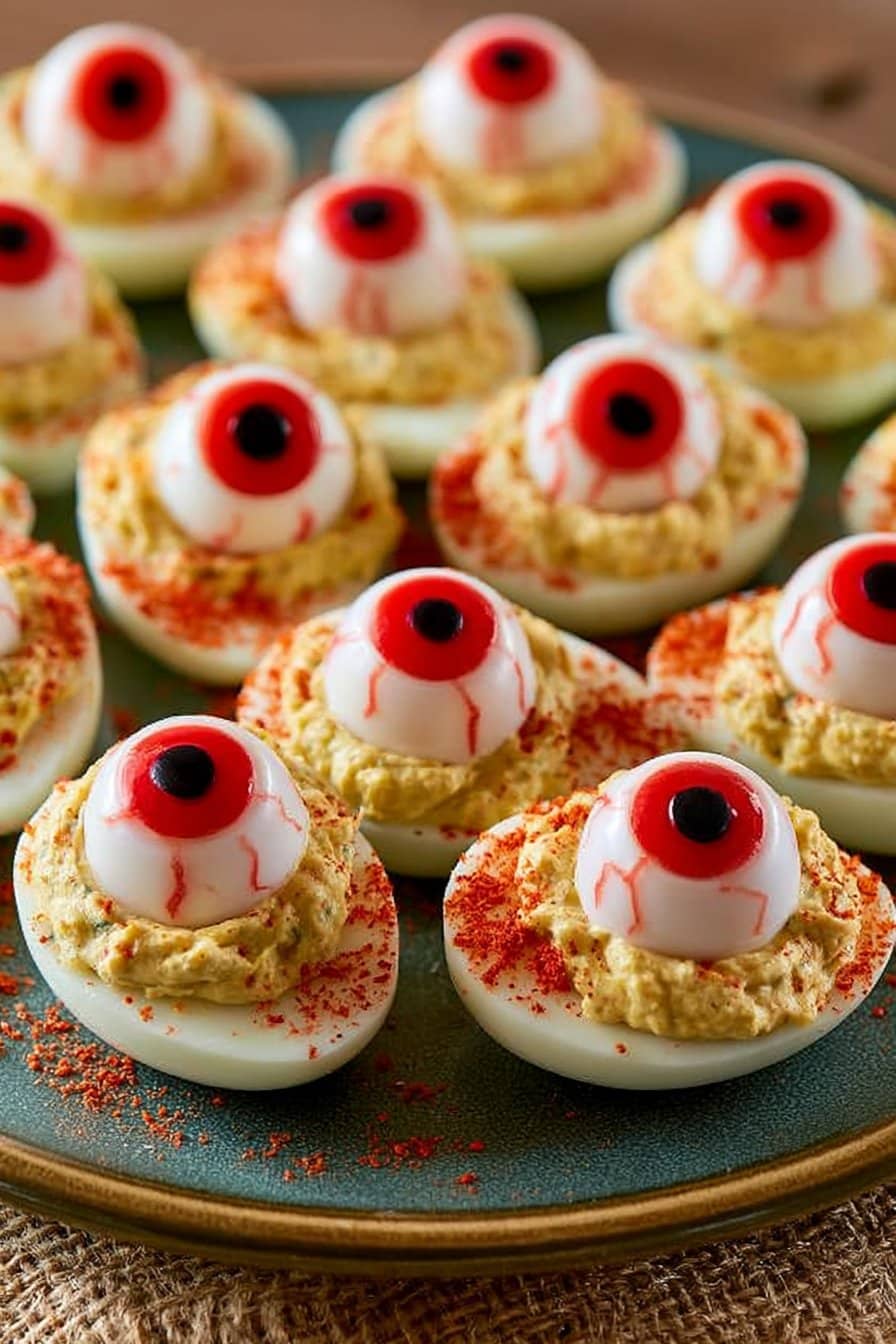
The creamy egg filling stays familiar and delicious, while slices of olives, paprika, and a little hot sauce turn each egg into a spooky eyeball. They’re easy to prepare ahead and look especially fun arranged together on a platter.
Prep time: 20 minutes
Cook time: 12 minutes
Total time: About 35 minutes
Difficulty: Easy
Servings: 12 deviled egg halves
Ingredients
- 6 large eggs
- 3 tablespoons mayonnaise
- 1 teaspoon yellow or Dijon mustard
- 1 teaspoon pickle juice
- ¼ teaspoon salt
- ¼ teaspoon black pepper
- ½ teaspoon paprika
- 1 tablespoon finely chopped pickles, optional
For the Eyeball Decoration
- 2–3 black olives, sliced into thin rounds
- ½ small red bell pepper
- Paprika, for garnish
- Hot sauce, optional
- Fresh chives or parsley, optional
How to Make Deviled Egg Eyeballs
- Boil the eggs.
Place the eggs in a saucepan and cover them with cold water. Bring the water to a boil, then reduce the heat and simmer for about 10–12 minutes. - Cool the eggs.
Transfer the cooked eggs to a bowl of ice water and let them cool for at least 5 minutes. - Peel the eggs.
Carefully peel the shells from the eggs and rinse away any small pieces of shell. - Cut the eggs.
Slice each egg in half lengthwise. Gently remove the yolks and place them in a small bowl. - Make the filling.
Mash the yolks with mayonnaise, mustard, pickle juice, salt, pepper, paprika, and chopped pickles if using. Stir until creamy. - Fill the eggs.
Spoon or pipe the yolk mixture back into the egg whites. A piping bag gives them a neater, more decorative finish. - Create the eyeballs.
Place one thin black olive slice in the center of each filled egg. This becomes the pupil. - Add the bloodshot effect.
Cut very thin strips of red bell pepper and arrange them around the olive to create red “veins.” You can also use a tiny amount of hot sauce for an even more dramatic effect. - Finish with paprika.
Sprinkle a small amount of paprika over the eggs for extra color and flavor. - Chill and serve.
Refrigerate the deviled eggs until you’re ready to serve. Arrange them closely together on a platter so the eyeball effect really stands out.
Easy Variations
Spicy Eyeballs:
Add hot sauce, cayenne pepper, or finely chopped jalapeño to the yolk mixture.
Bacon Deviled Eggs:
Mix crispy crumbled bacon into the filling and use a little extra on top.
Avocado Deviled Eggs:
Replace part of the mayonnaise with mashed avocado for a creamy green filling.
Smoky Deviled Eggs:
Use smoked paprika instead of regular paprika for a deeper flavor.
Extra Creepy Eyeballs:
Use a green olive slice as the iris and a small piece of black olive in the center as the pupil.
My Tip
The easiest way to get smooth, attractive filling is to pipe it into the egg whites instead of spooning it in. Even a simple zip-top bag with one corner snipped off works well.
For the spooky decoration, don’t worry about making every eyeball identical. Different-sized olive slices and slightly uneven red “veins” actually make them look more creepy and realistic.
You can boil and peel the eggs a day ahead, then prepare and decorate the deviled eggs a few hours before your guests arrive. Keep them refrigerated until serving.
These are classic Halloween finger foods with a fun twist, and they’re easy to eat while guests are standing and chatting. If you’re looking for Halloween appetizers ideas that don’t require complicated ingredients, these creepy little eyeballs are definitely worth adding to the menu.